¶ Introduction
This document explains how to configure network devices such as Switches, Routers, Firewalls or Servers to allow and accept SNMP requests from a Monitoring Server like blësk. Please take note that commands, as explained in this document, may vary according to your device version and models.
¶ SNMP Protocol
¶ Enable SNMP v2c on Cisco
Use Telnet or SSH to connect to your Switch, then enter the following commands to enable and configure SNMP.
conf t
snmp-server community 1qaz2wsx RO
snmp-server location Brossard
snmp-server contact support@domain.com
snmp-server host x.x.x.x version 2c 1qaz2wsxNote: The above commands will set it to allow any IP address to make SNMP requests on the router. The « 1qaz2wsx » represents the community string and « x.x.x.x » the IP address of the remote Monitoring Server to send Traps.
¶ Enable SNMP on Cisco Firewall
Use Telnet or SSH to connect to your Firewall, then enter the following commands to enable, configure SNMP.
conf t
snmp-server host <interfacename> x.x.x.x poll community 1qaz2wsx
snmp-server location Brossard
snmp-server contact support@domain.comNote: The above commands will set it to allow the IP of the Monitoring Server to make requests on the Firewall. The « 1qaz2wsx » represents the community string and « x.x.x.x » the IP address of the Remote Monitoring Server, « interfacename » represents the Interface Name on which you want to allow SNMP (i.e. Internet, outside, etc.).
¶ Enable SNMP v2c on Brocade
Use Telnet or SSH to connect to your switch, then enter the following commands to enable and configure SNMP.
conf t
snmp-server community 1qaz2wsx ro
snmp-server contact support@domain.com
snmp-server location Brossard
snmp-server host x.x.x.x version v2c 1qaz2wsx
exit
write memNote: The above commands will set it to allow any IP to make SNMP requests on the switch. The « 1qaz2wsx» represents the community string and « x.x.x.x » the IP address of the remote Monitoring Server used to send Traps.
¶ Enable SNMP v2c on HP
Use Telnet or SSH to connect to your switch, then enter the following commands to enable and configure SNMP.
configure
no snmpv3 only
snmp-server enable
snmp-server community 1qaz2wsx unrestricted
snmp-server contact support@domain.com
snmp-server location Brossard
snmp-server host x.x.x.x community 1qaz2wsx trap-level critical
exit
write memNote: The above commands will set it to allow any IP to make SNMP requests on the switch. The « 1qaz2wsx» represents the community string and « x.x.x.x » the IP address of the remote Monitoring Server used to send Traps.
¶ Enable SNMP v2c on DELL
Use Telnet or SSH to connect to your switch, then enter the following commands to enable and configure SNMP.
configure
snmp-server location Brossard
snmp-server contact support@domain.com
snmp-server community 1qaz2wsx
snmp-server host x.x.x.x 1qaz2wsx traps v2
exit
copy running-config startup-configNote: The above commands will set it to allow any IP to make SNMP requests on the switch. The « 1qaz2wsx» represent the community string and « x.x.x.x » the IP address of the remote Monitoring Server used to send Traps.
¶ Enable SNMP v2c on Force 10
Use Telnet or SSH to connect to your switch, then enter the following commands to enable and configure SNMP.
configure
snmp-server location Brossard
snmp-server contact support@domain.com
snmp-server community 1qaz2wsx ro
snmp-server host x.x.x.x 1qaz2wsx traps v2
snmp-server host x.x.x.x traps version 2c 1qaz2wsx udp-port 162
exit
write memoryNote The above commands will set it to allow any IP to make SNMP requests on the switch. The « 1qaz2wsx» represents the community string and « x.x.x.x » the IP address of the remote Monitoring Server used to send Traps.
¶ Enable SNMP v2c on FortiSwitch
Connect to your FortiGate, then enter the following commands in CLI to enable and configure SNMP on all FortiSwitchs at the same time.
Step 1 – Set up a local-access security policy with the following commands to allow SNMP access on the internal interfaces.
config switch-controller security-policy local-access
edit default
set internal-allowaccess ping snmp
end
Step 2 – Configure SNMP system information and community globally
config switch-controller snmp-sysinfo
set status enable
set engine-id 1
set name public
set description FortiSwitch
set contact-info support@domain.com
set location Montreal
end

config switch-controller snmp-community
edit 1
set status enable
set query-v1-status disable
set query-v2c-status enable
set trap-v1-status disable
set trap-v2c-status enable
set events cpu-high mem-low log-full intf-ip ent-conf-change
config hosts
edit 1
set ip x.x.x.x
end
end1. (set name public) – public is the community string here.
2. (set ip x.x.x.x) – x.x.x.x represent the IP of your blësk server.
3. We disable SNMP v1 and enable SNMP v2c.
¶ Enable SNMP v2c on Windows
Use RDP to connect to your Windows, then do the following steps to enable and configure SNMP.
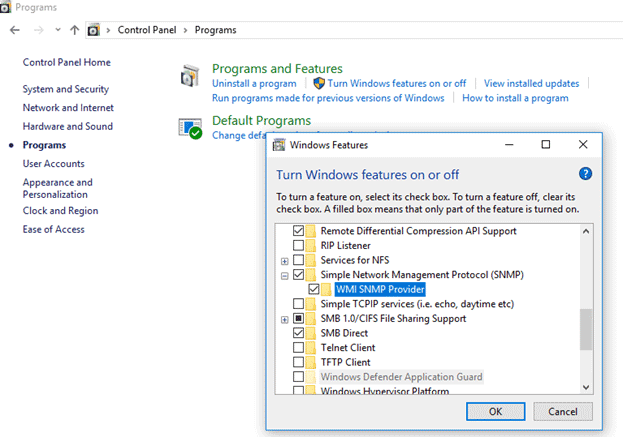
Step 1 – You can install the SNMP service via the Control Panel. Go to Control Panel > Programs and Features > Turn Windows features on or off. In the list of Windows features, select Simple Network Management Protocol (SNMP) and click OK.

Note You can also install SNMP service using PowerShell:
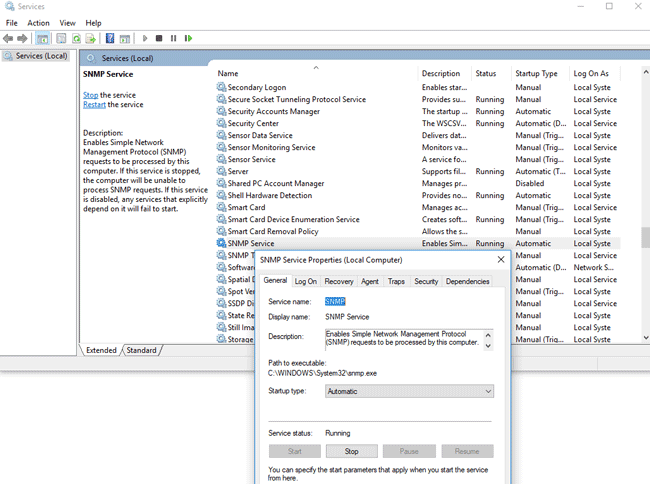
Enable-WindowsOptionalFeature -online -FeatureName SNMPStep 2 – After the installation, SNMP services should start automatically. Open the Services management console (services.msc). Two new services should appear in the service list:
- SNMP Service – This is the primary SNMP agent service, that tracks activity and sends information;
- SNMP Trap – Receives trap messages from local or remote SNMP agents, and forwards messages to the SNMP management software that is being run on that computer.
Open the properties of the SNMP Service. If it is stopped, start it by pressing the Start button and changing the startup type to Automatic.

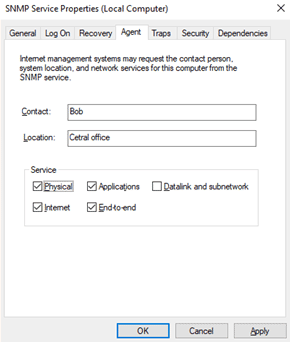
Step 3 – Click the Agent tab. Fill in the Contact and Location fields (you can specify the user’s contact name and computer location), and select the list of services from which you want to collect data and send it to the monitoring device. There are five service-based options:
- Physical;
- Applications;
- Internet;
- End-to-end;
- Datalink and subnetwork.

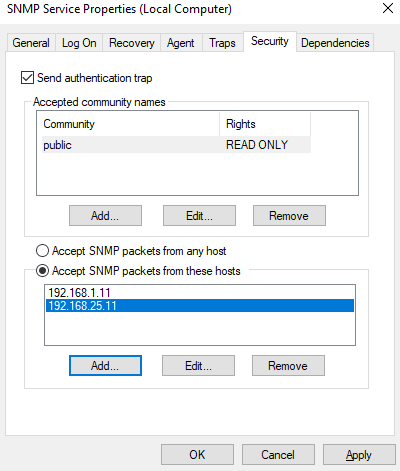
Step 4 – Click the Security tab. Here you can configure various security settings for different SNMP servers.
The list of Accepted community names contains the names of the communities whose SNMP hosts are authenticated to send SNMP requests to this computer. Community name has the same functions like login and password.
Click the Add button and specify the Community Name and one of the five access levels (None, Notify, READ ONLY, READ WRITE, READ CREATE). READ WRITE is the maximum access level at which the SNMP management server can make changes to the system. For monitoring systems, it is usually enough to select READ ONLY, while the monitoring server can only poll the system, but not make changes. In our example, we added a community name public with READ ONLY rights.
Next, add to the Accept SNMP packets from these hosts list of monitoring servers (hostnames or IP addresses) from which you want to accept SNMP packages.

Note: You can select the Accept SNMP packets from any host option, but this is not safe.
¶ Enable SNMP v2c on Avaya/Nortel
To configure SNMP for the Nortel, access the SNMP menu by using the following command.
/cfg/sys/adm/snmp1 – Specifies the SNMP versions allowed:
/cfg/sys/adm/snmp followed by: v2c2 – Configure the community string:
/cfg/sys/adm/snmp/community followed by: read publicSpecifies the monitor community string (public in our example) that grants read access. If you do not specify a monitor community name, read access is not granted.
3 – Configure the community name that accompanies trap messages sent to the SNMP manager:
/cfg/sys/adm/snmp/community followed by: trap publicIn the above example, the public is the trap community name. If you do not specify a trap community name, the sending of trap messages is disabled.
4 – Configure notification targets (where SNMP Traps are sent), with the following command:
/cfg/sys/adm/snmp/target <target ID> followed by : ip x.x.x.x version v2c<target ID> is a positive integer that uniquely identifies the notification target in the cluster. x.x.x.x represents the IP address to which trap messages are sent. version v2c specifies the SNMP version used by the SNMP manager.
¶ Enable SNMP v2c on ESXi
SSH or Telnet to your ESXi node using root-level credentials, then enter the following commands to enable and configure SNMP.
For ESXi 5.5 :
esxcli system snmp set --communities YOUR_STRING
esxcli system snmp set --enable true
esxcli network firewall ruleset set --ruleset-id snmp --allowed-all true
esxcli network firewall ruleset set --ruleset-id snmp --enabled true
/etc/init.d/snmpd restartFor ESXi 6.x :
esxcli system snmp set -r
esxcli system snmp set -c YOUR_STRING
esxcli system snmp set -p 161
esxcli system snmp set -L "City, State, Country"
esxcli system snmp set -C noc@example.com
esxcli system snmp set -e yesNote: Replace YOUR_STRING with your desired community string.