¶ Users
The blësk Network Security Manager (NSM) allows for the definition and management of multiple users with different roles and permissions. When initializing the blësk NSM, the first user would be the web/scan administrator, already created in the blësk administration menu. With this user, additional users can be created and managed.
Roles
The blësk NSM user management supports a role based permission concept when accessing the web interface. Various roles are already set up by default. Additional roles can be created and used by an administrator. The role defines which options of the web interface can be viewed and modified by the user.
Groups
In addition to roles, the blësk NSM user management supports groups as well. This serves mainly for logical grouping. Groups and roles may be used to assign permissions to several users at once.
Each user is assigned an IP address range containing the allowed or denied targets. The user management is completely done with the blësk NSM. External sources for the user management are not supported.
¶ Creating a User
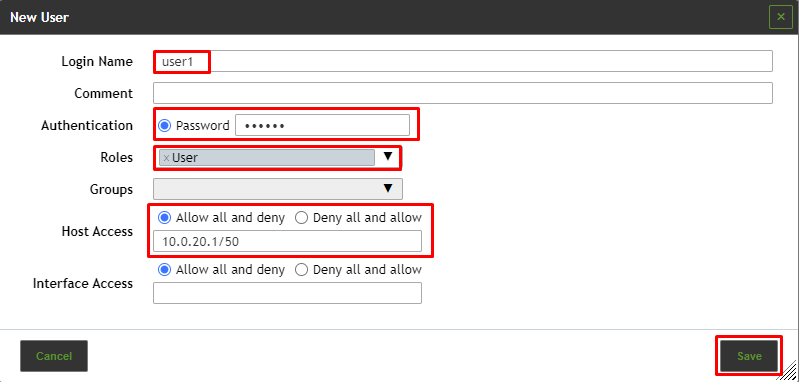
Users can be created as follows:
- Log in as an administrator.
- Select Administration > Users in the menu bar.
- Create a new user by clicking
 .
. - Define the user.
- Click Create.

⇒ The user is created and displayed on the page Users.
Login Name
This is the name used for logging in. The name can contain letters and numbers and can be at most 80 characters long.
Authentication
This is the password used for logging in. The password can contain any type of character and can be at most 40 characters long.
Roles
Each user can have multiple roles. The roles define the permissions of a user when using blësk NSM. The roles Admin, User, Info, Observer, Guest and Monitor are available. Additionally, it is possible to add and configure custom roles.
If a user with a custom role should be able to use the web interface, at least the following permissions are necessary for that role:
- authenticate
- get_settings
- help
Groups
Each user can be a member of multiple groups. Permissions management can be performed using groups as well.
Host Access
Hosts on which the user is allowed to run scans. The restrictions also apply to administrators but they are allowed to remove them themselves. Normal users (User) and roles without access to the user management cannot circumvent the restrictions. Basically either a whitelist (deny all and allow) or a blacklist (allow all and deny) is possible.
- Whitelist
The scanning of all systems is denied in general. Only explicitly listed systems are allowed to be scanned.
- Blacklist
The scanning of all systems is allowed in general. Only explicitly listed systems are not allowed to be scanned.
¶ Managing Users
List Page
All existing users can be displayed by selecting Administration > Users in the menu bar when logged in as an administrator.
For all users the following information is displayed:
Name
Name of the user. Global users are users who are created in the blësk NSM administration menu and are marked with [view_other Icon].
Roles
Role of the user.
Groups
Groups to which the user belongs.
Host Access
Hosts on which the user is allowed to run scans.
Authentication Type
Password.
¶ Groups
Groups are used to logically assemble users. An unlimited number of groups can be created. Permissions can be assigned for the groups. By default, no groups are set up.
¶ Creating a Group
A group can be created as follows:
- Log in as an administrator.
- Select Administration > Groups in the menu bar.
- Create a new group by clicking
 .
. - Define the group
- Click Save.
⇒ The group is created and displayed on the page Groups.
The following details of the group can be defined:
Name
The name of the group can contain letters and numbers and can be at most 80 characters long.
Comment (optional)
A comment describes the group in more detail.
Users
The members of the group can be selected in the drop-down list Users. Alternatively, group memberships can be managed in the user profile.
Special Groups
Activate the checkbox if all group members should have read and write access to all resources of the group.
¶ Managing Groups
List Page
All existing groups can be displayed by selecting Administration > Groups in the menu bar.
For all groups the following information is displayed:
Name
Name of the group.
For all groups the following actions are available:
 Move the group to the trashcan.
 Edit the group.
 Clone the group.
 Export the group as an XML file.
Details Page
Click on the name of a group to display the details of the group. Click  to open the details page of the group.
The following registers are available:
Information
General information about the group.
User Tags
Assigned tags.
Permissions
Permissions of the group or of other users/roles/groups to the resources of the group.
¶ Roles
The blësk NSM management interface supports the creation and configuration of own user roles.
The following roles are available by default:
- Admin
This role has all permissions by default. It is especially allowed to create and manage other users, roles and groups.
- User
This role has all permissions by default except for user, role and group management. This role is not allowed to synchronize and manage the feeds. In the web interface there is no access to the page Administration.
- Info
This role (Information Browser) has only read access to the NVTs and SCAP information. All other information is not accessible. The role can modify personal setting, e.g., change the password.
- Guest
This role corresponds with the role Info but is not allowed to change the user settings.
- Monitor
This role has access to system reports of the NSM
- Observer
This role has read access to the system but is not allowed to start or create new scans. It has only read access to the scans for which it has been set as an observer.
- Super Admin
This role has access to all objects of all users. It has no relation to the super user (su/root) in the blësk NSM administration menu. This role cannot be configured in the web interface and users with this role cannot be deleted using the web interface. Users with this role should be managed using the blësk NSM administration menu.
¶ Creating a Role
When a role with only limited functionality should be created, it can be started with a new, empty role:
- Log in as an administrator.
- Select Administration > Roles in the menu bar.
- Create a new role by clicking
 .
. - Define the role.
- Click Save.
- In the row of the newly created role click [edit icon].
- Add a permission by selecting it in the drop-down list Name and clicking Create Permission.
- Add a super permission by selecting the respective group in the drop-down list Group and clicking Create Permission.
- Click Save.
The following details of the role can be defined:
Name
The name of the role can contain letters and numbers and can be at most 80 characters long.
Comment (optional)
A comment describes the role in more detail.
Users
The users with this role can be selected in the drop-down list Users. Alternatively, roles can be managed in the user profile.
⇒ The role is created and displayed on the page Roles.
To Delete a permission by clicking  in the list General Command Permissions.
¶ Cloning an Existing Role
When an existing role closely reflects the demands, a new role can be created by cloning the existing role:
- Log in as an administrator.
- Select Administration > Roles in the menu bar.
- In the row of an existing role click
 .
. - In the row of the clone click
 .
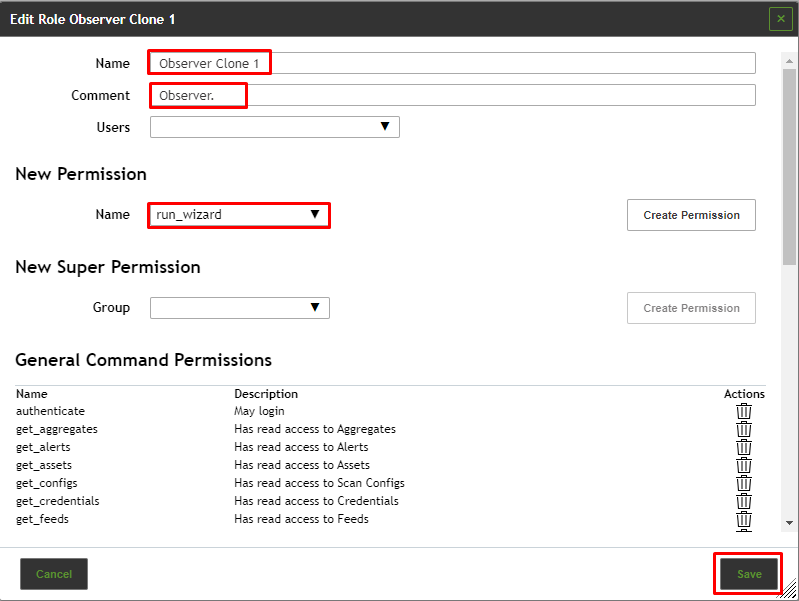
. - Enter the name of the role in the input box Name.
- Select the users that should have the role in the drop-down list Users.
- Add a permission by selecting it in the drop-down list Name and clicking Create Permission.
- Add a super permission by selecting the respective group in the drop-down list Group and clicking Create Permission.
- Click Save.
To Delete a permission by clicking  in the list General Command Permissions.

¶ Permissions
Select Administration > Permissions to display all permissions assigned on the system. If multiple roles are created, there can easily be hundreds of permissions.
Each permission relates to exactly one subject. A permission enables a subject to perform an associated action.
Subjects can be of the following types:
- Users
- Roles
- Groups
There are two types of permissions:
- Command permissions
Command permissions are linked to the NSM Management Protocol (NMP). Each command permission applies to a specific NMP command. The name of the permission is the relevant command.
A command permission is either a command level permission or a resource level permission.
- Command level
When no resource is specified, a command level permission is created. A command level permission allows the subject to run the given NMP command.
- Resource level
When a resource is specified, a resource level permission is created. A resource level permission allows the subject to run the given NMP command on a specific resource.
¶ Creating a Permission
A new permission can be created as follows:
- Select Administration > Permissions in the menu bar.
- Create a new permission by clicking
 .
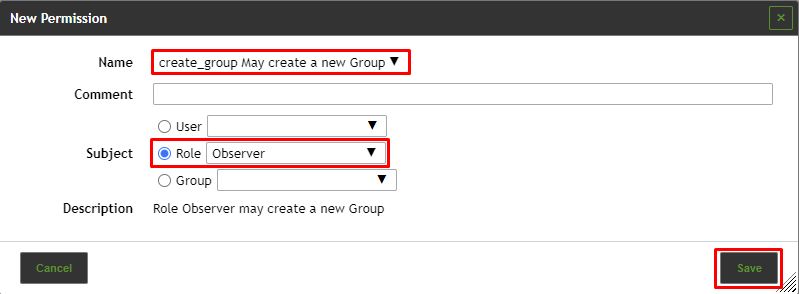
. - Define the permission.
- Click Save.

⇒ The permission is created and displayed on the page Permissions.
The following details of the permission can be defined:
Name
Permission that should be granted.
Comment (optional)
A comment describes the permission in more detail.
Subject
Subject (user, role or group) that should be granted with the permission.
Resource Type (only for the permission Super (Has super access))
Resource type (user, role or group) to which the user/role/group has super access.
User/role/group ID (only for the permission Super (Has super access))
ID of the user/role/group to which the user/role/group has super access.
Description
Textual description of the permission.
¶ Managing Permissions
List Page
All existing permissions can be displayed by selecting Administration > Permissions in the menu bar.
For all permissions the following information is displayed:
Name
Name of the permission. A global permission is marked with  .
.
Description
Textual description of the permission.
Resource Type
Resource type to which the user/role/group has access.
Resource
Name of the resource to which the user/role/group has access.
Subject Type
Subject type (user/role/group) that is granted with the permission.
Subject
Subject that is granted with the permission.
¶ Trashcan
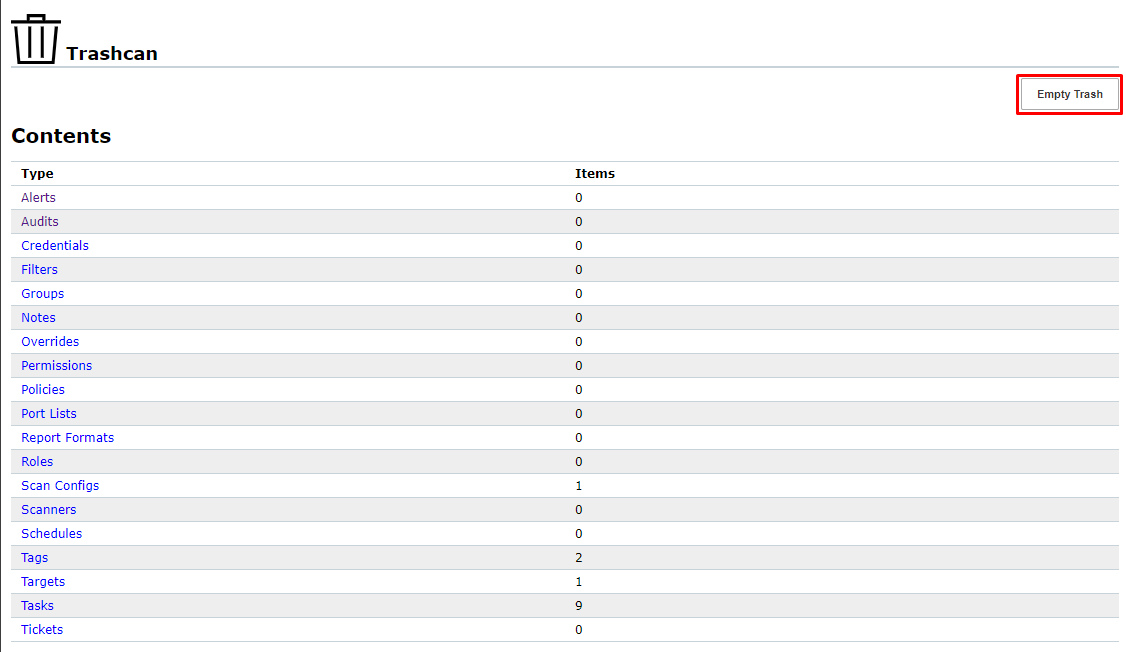
The page Trashcan is opened by selecting Administration > Trashcan in the menubar. The page lists all objects that are currently in the trashcan, grouped by object type.
The summary table Content shows all possible types of deleted objects with object counts. By clicking on an object name the corresponding section is shown.
The trashcan can be emptied by clicking Empty Trash.

In the section of the respective object type the single objects can be managed:
- Clicking
 the object out of the trashcan and back to its regular page. The object cannot be restored if it depends on another object in the trashcan.
 - Clicking
 the object entirely from the system. The object cannot be deleted if another object in the trashcan depends on it.

¶ Feed Status
The synchronization status of all SecInfo can be displayed by selecting Administration > Feed Status in the menu bar.
The following information is displayed:
Type
Feed type (NVT, SCAP or CERT).
Content
Type of information provided by the feed.
Origin
Name of the feed service that is used to synchronize the SecInfo.
Version
Version number of the feed data.
Status
Status information of the feed, e.g., time since the last update.
If a feed update is currently being performed, Update in progress… is displayed. This status is displayed for all feeds, even if only one feed is currently being updated.