¶ Targets
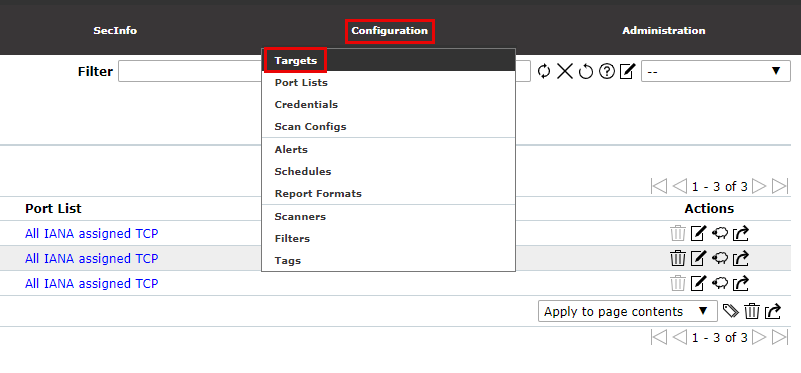
To run scans against vulnerabilities, first, the targets need to be defined. To access the “Targets” page to view a list of targets or to set a target, click on the “Targets” submenu from the “Configuration” menu from the top menu bar.
¶ Creating a Target
The steps to define a scan target are as follows:
- Select Configuration > Targets in the menu bar.
- Create a new target by clicking [New Icon].
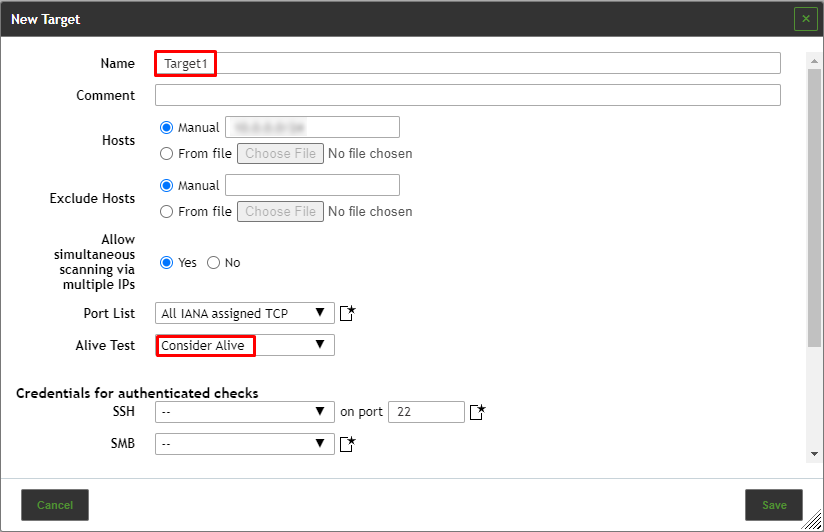
- Define the target
4. Click Save.
The following information can be entered:
Name
The name can be chosen freely. A descriptive name should be chosen if possible. Possibilities are Mailserver, ClientNetwork, Webserverfarm, DMZ or describing the entered systems in more detail.
Comment
The optional comment allows specifying background information. It simplifies understanding the configured targets later.
Hosts
Manual entry of the hosts that should be scanned, separated by commas, or importing a list of hosts.
Exclude Hosts
Manual entry of the hosts that should be excluded from the list mentioned above, separated by commas, or importing a list of hosts.
The same specifications as for Hosts apply.
Port list
Port list used for the scan
Alive Test
This option specifies the method to check if a target is reachable. more about Alive Test has been described in Alive Test Section.
SSH Credential
Selection of a user that can log into the target system of a scan if it is a Linux or Unix system. This allows for an authenticated scan using local security checks.
SMB Credential
Selection of a user that can log into the target system of a scan if it is a Microsoft Windows system. This allows for an authenticated scan using local security checks.
ESXi Credential
Selection of a user that can log into the target system of a scan if it is a VMware ESXi system. This allows for an authenticated scan using local security checks.
SNMP Credential
Selection of a user that can log into the target system of a scan if it is an SNMP aware system. This allows for an authenticated scan using local security checks.
¶ Port Lists
If applications run on unusual ports and they should be monitored and tested with the blësk NSM, the default port lists should be adapted. If necessary, an individual port list including the desired port can be created.
All default port lists by blësk NSM are data objects that are distributed via the feed. They are downloaded and updated with each feed update.
If no default port lists are available, a feed update may be necessary, or the Feed Import Owner may need to be set.
Default port lists cannot be edited. Additionally, they can only be deleted temporarily by the Feed Import Owner or by a super administrator. During the next feed update, they will be downloaded again.
¶ Creating a Port List
A new port list can be created as follows:
- Select Configuration > Port Lists in the menu bar.
- Create a new port list by clicking
 .
. - Define the port list.

4. Click Save.
The following details of the port list can be defined:
Name
Definition of the name. The name can be chosen freely.
Comment
An optional comment can contain additional information.
Port Ranges
Manual entry of the port ranges or importing of a list of the port ranges. If entered manually, the port ranges are separated by commas. If importing from a file, the entries can be separated with commas or line breaks. The file should use UTF-8 text encoding.
Each value in the list can be a single port (e.g., 7) or a port range (e.g., 9-11). These options can be mixed (e.g., 5, 7, 9-11, 13).
An entry in the list can be preceded by a protocol specifier (T: for TCP, U: for UDP), e.g., T:1-3, U:7, 9-11 (TCP ports 1, 2 and 3, UDP ports 7, 9, 10 and 11). If no specifier is given, TCP is assumed.
¶ Importing a Port List
A port list can be imported as follows:
- Select Configuration > Port Lists in the menu bar.
- Click
 .
. - Click Browse… and select the XML file of the port list.
- Click Import.
⇒ The imported port list is displayed on the page Port Lists.
¶ Credentials
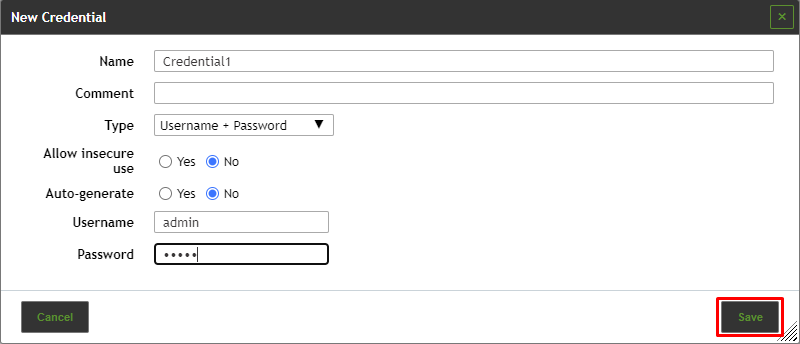
Credentials for local security checks are required to allow VTs to log into target systems, e.g., for the purpose of locally checking the presence of all vendor security patches.
¶ Creating a Credential
A new credential can be created as follows:
- Select Configuration > Credentials in the menu bar.
- Create a new credential by clicking
 .
. - Define the credential.
4. Click Save.
¶ Scan Configs
The blësk NSM appliance comes with various predefined scan configurations. They can be customized and new scan configurations can be created.
¶ Default Scan Configurations
All default scan configurations by blësk NSM are data objects that are distributed via the feed. They are downloaded and updated with each feed update.
If no default scan configurations are available, a feed update may be necessary, or the Feed Import Owner may need to be set.
Default scan configurations cannot be edited. Additionally, they can only be deleted temporarily by the Feed Import Owner or by a super administrator. During the next feed update, they will be downloaded again.
Empty
This scan configuration is an empty template containing no VTs. It can be cloned and used for a completely individual created scan configuration.
Base
This scan configuration only uses VTs which collect information about the target system. No vulnerabilities are being detected. It can be cloned and used for a completely individual created scan configuration.
The used port scanners are Ping Host and Nmap which detect whether a host is alive. Additionally, information about the operating system is collected.
Discovery
This scan configuration only uses VTs that provide information about the target system. No vulnerabilities are being detected.
Amongst others, the collected information contains information about open ports, used hardware, firewalls, used services, installed software and certificates. The system is inventoried completely.
Host Discovery
This scan configuration is used to detect target systems. No vulnerabilities are being detected.
The used port scanner is Ping Host which detects whether a host is alive.
System Discovery
This scan configuration is used to detect target systems including installed operating systems and used hardware. No vulnerabilities are being detected.
The used port scanners are Ping Host and Nmap which detect whether a host is alive.
Full and fast
For many environments this is the best option to start with.
This scan configuration is based on the information gathered in the previous port scan and uses almost all VTs. Only VTs that will not damage the target system are used. VTs are optimized in the best possible way to keep the potential false negative rate especially low. The other “Full” configurations only provide more value in rare cases but with much higher effort.
Full and fast ultimate
This scan configuration expands the scan configuration Full and fast with VTs that could disrupt services or systems or even cause shutdowns.
Full and very deep
This scan configuration is based on the scan configuration Full and fast but the results of the port scan or the application/service detection do not have an impact on the selection of the VTs. Therefore, VTs that wait for a timeout or test for vulnerabilities of an application/service which were not detected previously are used. A scan with this scan configuration is very slow.
Full and very deep ultimate
This scan configuration expands the scan configuration Full and very deep with dangerous VTs that could cause possible service or system disruptions. A scan with this scan configuration is very slow.
¶ Creating a Scan Configuration
A new scan configuration can be created from scratch; however, a convenient way of creating Scan Configuration has been described below:
From the list of Scan Configs, clone the “Full and fast” option from the list by clicking on [Clone Icon].
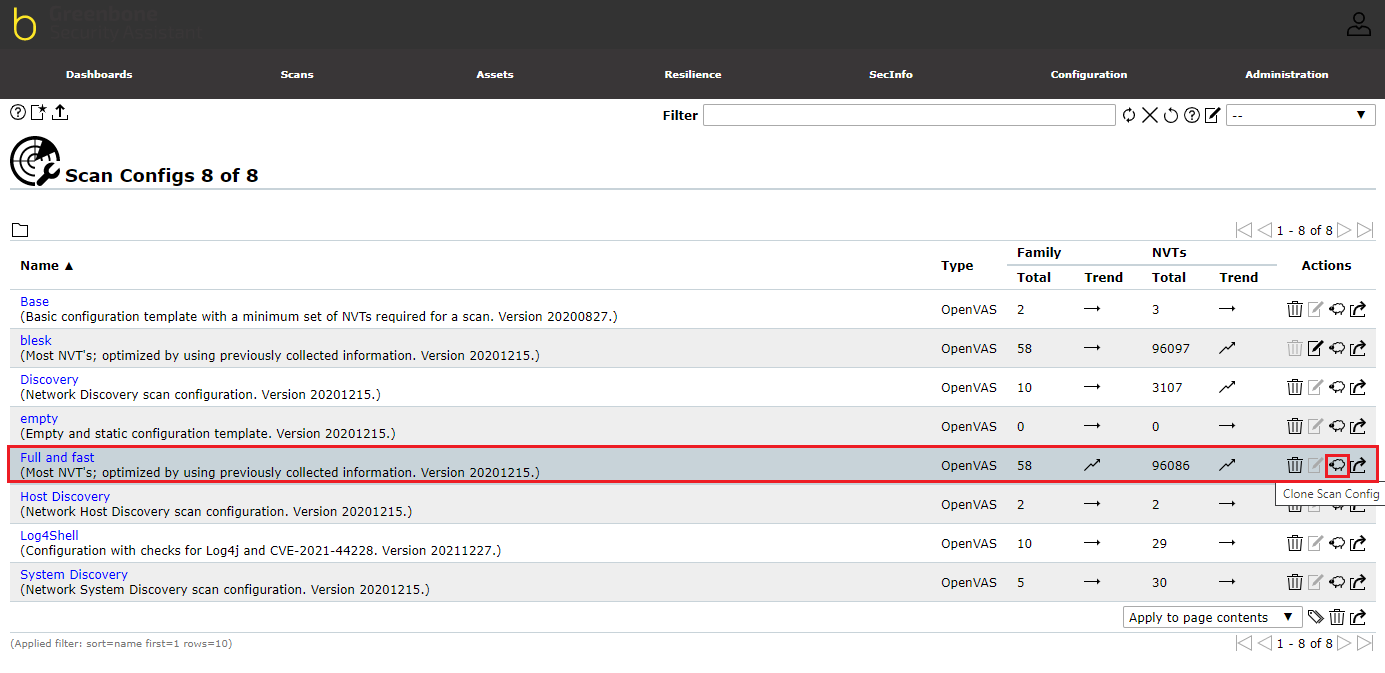
To edit the cloned Scan Configuration (Full and fast Clone 1), click the edit button to open the edit dialog box to set the parameters.
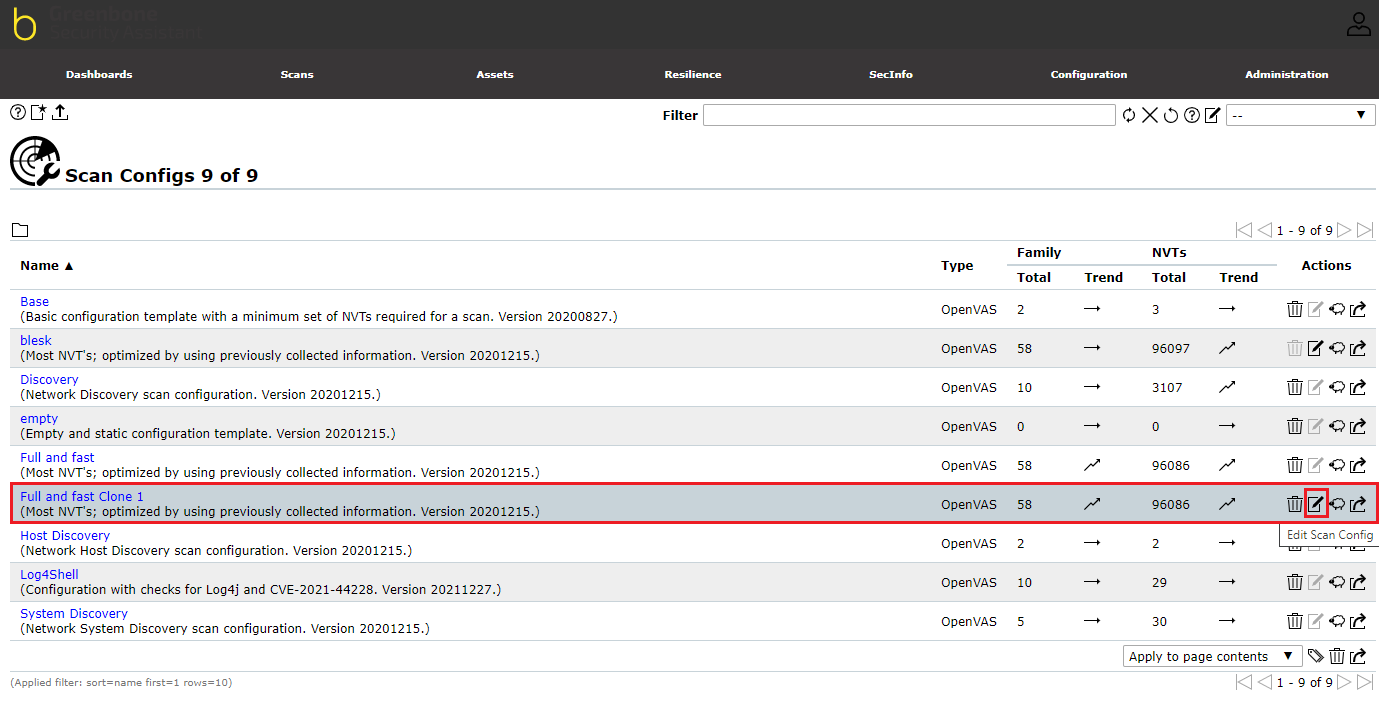
Make the following changes to the dialog box:
- Rename the Scan Config to blesk
- Under the Select all NVTs, check all the chek boxes
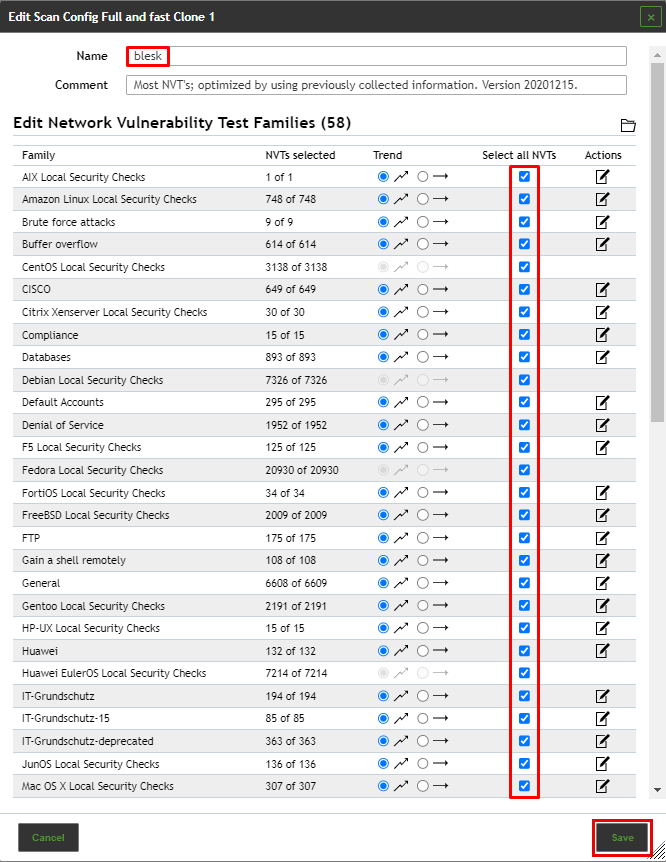
- Click the Save button to save the changes.
¶ Alerts
Alerts are anchored within the system. If a configured event (e.g., a task is finished) happens, a specified condition is checked (e.g., vulnerability with a high severity category detected). If the conditions is met, an action is performed, e.g., an e-mail is sent to a defined address.
¶ Creating an Alert
A new alert can be created as follows:
- Select Configuration > Alerts.
- Create a new alert by clicking
 .
. - Define the alert.
- Click Save.
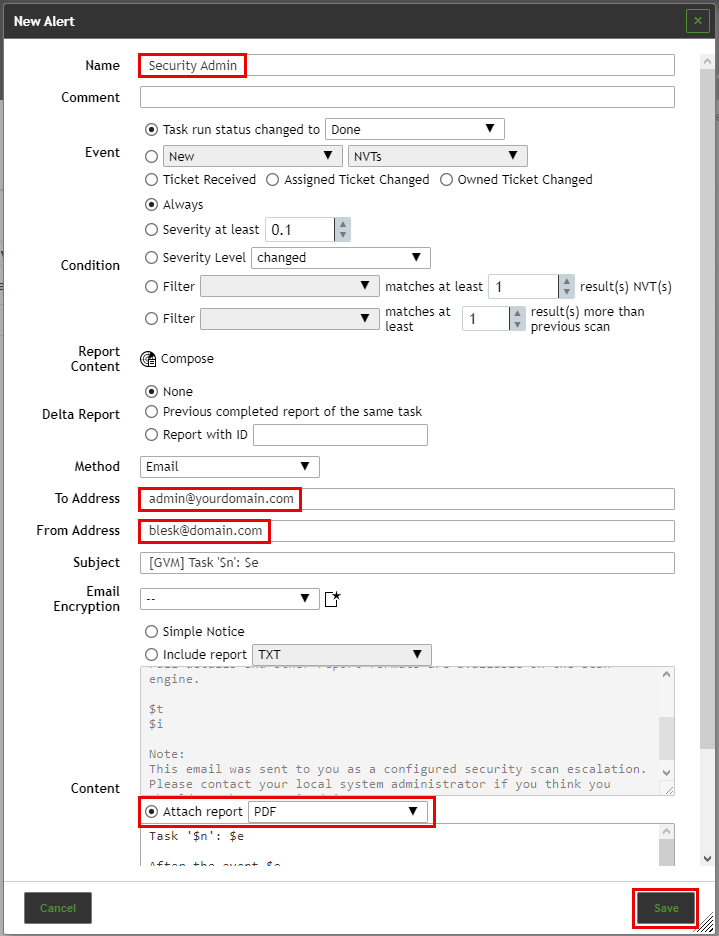
The following details of the alert can be defined:
Name
Definition of the name. The name can be chosen freely.
Event
Definition of the event for which the alert message is sent. Alerts can be sent if the status of a task changes, if SecInfo (VTs, CVEs, CPEs, CERT-Bund Advisories, DFN-CERT Advisories, OVAL Definition) is added or updated or if a ticket is assigned or edited.
Condition
Definition of the additional conditions that have to be met.
The alert message can occur:
- Always
- If a specific severity level is reached.
- If the severity level changes, increases or decreases.
- If a Powerfilter matches at least the specified number of results more than in the previous scan.
The report is sent to a given e-mail address.
The settings To Address and From Address, other configurations are optional.
- To Address
E-mail address to which the e-mail is sent.
- From Address
E-mail address that is stated as the e-mail’s sender.
Content
The content of the e-mail can be a simple notice, an included or an attached report.
- Include Report
The report can be included directly in the e-mail. Any report format that uses a content type starting with text/ can be chosen because e-mails do not support binary content directly.
- Attach Report
The report can be attached to the e-mail. Any report format can be chosen. The report will be attached to the generated e-mail in its correct MIME type. In this demonstration we have selected attach report to the email as PDF.
¶ Schedules
For continuous vulnerability management the manual execution of task is tedious. The blësk NSM supports the scheduling of tasks for their automation and refers to schedules as automatic scans at a specific time. They can be run once or repeatedly.
To view or to create a new schedule to run a scan, click on the “Schedules” submenu from the ”Configuration” menu from the top menu bar.
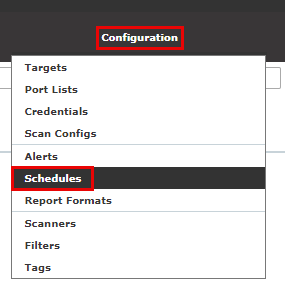
To schedule a scan task, click the add Schedules icon from the top left-hand corner, new schedule form will appear as the image below.

¶ Creating a Schedule
A new schedule can be created as follows:
- Select Configuration > Schedules in the menu bar.
- Create a new schedule by clicking
 .
. - Define the schedule.
- Click Save.
⇒The schedule is created and can be selected when creating a new task.
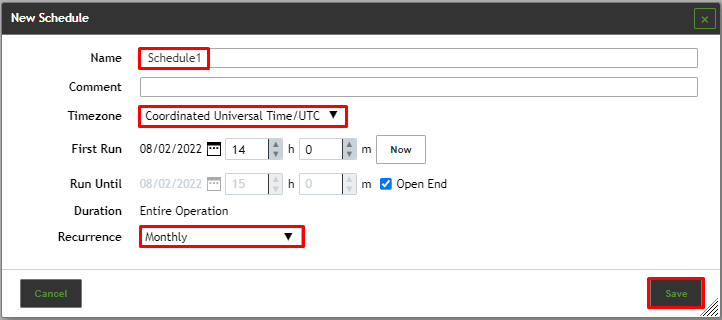
The following details of the schedule can be defined:
Name
Definition of the name. The name can be chosen freely.
Comment
An optional comment can contain additional information.
Timezone
Definition of the timezone the time refers to. UTC is default.
First Run
Definition of the date and time for the first scan to start.
By clicking  . the date can be chosen. By clicking Now the current date and time are set for the first run.
Run Until
Definition of the date and time for the first scan to end.
By clicking  the date can be chosen. Activate the checkbox Open End to leave the end time open.
Duration
Definition of the maximum duration a task can take for its execution. The duration depends on the given start and end time. If an end time is defined and the assigned time is expired, the task is aborted and will be suspended until the next scheduled time slot becomes available. This way it can be ensured that the scan will always run with a specific (maintenance) time window.
Recurrence
Definition of the repetition rate of the task. It can be selected between Once, Hourly, Daily, Weekly, Monthly, Yearly, Workweeks (Monday till Friday) or Custom. If the option Custom is selected, the repetition rate and the days on which the task should be run can be chosen.
¶ Managing Schedules
List Page
All existing schedules can be displayed by selecting Configuration > Schedules in the menu bar.
For all schedules the following information is displayed:
Name
Name of the schedule.
First Run
Start time of the first run of the task.
Next Run
Next run of the task according to the current date and time.
Recurrence
Repetition rate of the task.
Duration
Maximum duration a task can take for its execution. The duration depends on the given start and end time. If an end time is defined and the assigned time is expired, the task is aborted and will be suspended until the next scheduled time slot becomes available. This way it can be ensured that the scan will always run with a specific (maintenance) time window.
For all schedules the following actions are available:
 Move the schedule to the trashcan. Only schedules which are currently not used can be moved to the trashcan.
 Edit the schedule.
 Clone the schedule.
 Export the schedule as an XML file.
¶ Scanners
The blësk NSM appliance comes with two predefined scanners. They can be managed and new scanners can be created.
The following scanners are already available:
- OpenVAS Default
- CVE: the CVE scanner allows forecasting possible security risks based on current information about known vulnerabilities from the SecInfo management without the need of a new scan

¶ Managing Scanners
List Page
All existing scanners can be displayed by selecting Configuration > Scanners in the menu bar.
For all scanners the following actions are available:
 Move the scanner to the trashcan. Only self-created scanners can be moved to the trashcan.
 Edit the scanner. Only self-created scanners can be edited.
 Clone the scanner. Only self-created scanners can be cloned.
 Export the scanner as an XML file.
 Verify that the scanner is online and that the manager can connect to it using the provided certificates and credentials.
 Download the certificate or CA certificate. The certificate or CA certificate can only be downloaded for self-created scanners.
¶ Filters
Almost every page in the web interface offers the possibility to filter the displayed content. In this section we will discuss about how to create a Filter.
¶ Creating a Filter
To create a filter, follow the steps below:
- Select Configuration > Filters in the menu bar.
- Create a new filter by clicking
 .
. - Define the name of the filter.
- Define the filter criteria in the input box Term.
- Select the object type for which the filter should by applied in the drop-down list Type.

6. Click Save.
⇒The filter can be used for the object type for which it was created.
¶ Tags
Tags are information that can be linked to any object. Tags are created directly with the objects and can only be linked to the object type they are created for.
Tags can be used to filter objects.
Example: when filtering for tag=target the specific tag must be set. Otherwise, the desired result would not be found. With tag="target=mailserver" the exact tag with the respective value must be set.
¶ Creating a Tag
To create a tag, follow the steps below:
- Select Configuration > Tags in the menu bar.
- Create a new Tag by clicking
 .
. - Define the name of the filter.
- Adding comment is optional.
- Define the value.
- Select the Resources from the dropdown or type the resource ID in the ID field.
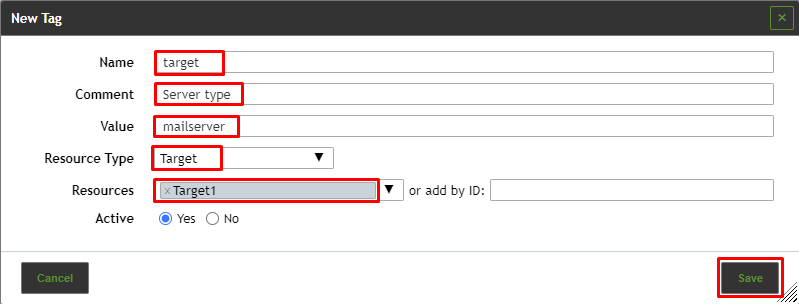
7. Click Save.
¶ Linking a Tag to a Single Object
A tag for a single object can be created as follows:
- Open the details page of the object.
- Click on the register User Tags.
- Click
 in the opened section User Tags.
 - Adding comment is optional.
- Define the tag.
- Click Save.
¶ Linking a Tag to Multiple Objects
A tag can be added to multiple objects of the same type (e.g., tasks, targets, scanners) as follows:
- Open the list page of an object type.
- Filter the list so that only the objects that should have the tag are displayed.
- In the drop-down list below the list of objects select to which objects the tag should be added.
- In the drop-down list below the list of objects select Apply to selection.
- Activate the checkboxes of the objects that should have the tag in the column Actions.
- Click
 below the list of objects.
 - Select the tag in the drop-down list Choose Tag.
- Click Add Tag.

