¶ Introduction
Removing a device from blësk can be as simple as clicking on the corresponding “Delete” icon. However, if the device you want to remove is the last one of its type or has some services associated which are no longer used by other devices there are a few extra steps. In the following section, we’ll explain the proper way to remove a device from BLESK.
The first example is a Windows server called “SERVER1” which has some services associated with it that are not used by other Windows servers monitored by blësk. The second example will assume that another Windows server called “SERVER2” is the last one of its type monitored by blësk.
These are special cases that required special attention, otherwise, just clicking the “Delete” icon is sufficient for removing the device.
¶ Check for dependencies
In the following example, we will remove a device (Windows Server called SERVER1) that has dependencies, associations, or if you prefer certain services that are not used or shared by other monitored devices in blësk.
1 – Go to APM | Configure, then authenticate yourself.

2 – Once authenticated, click Supervision | Host, then in the list, click on the icon called “Information” to get more information about the device (SERVER1) and see what services are associated with it to know if you can delete it now or not.
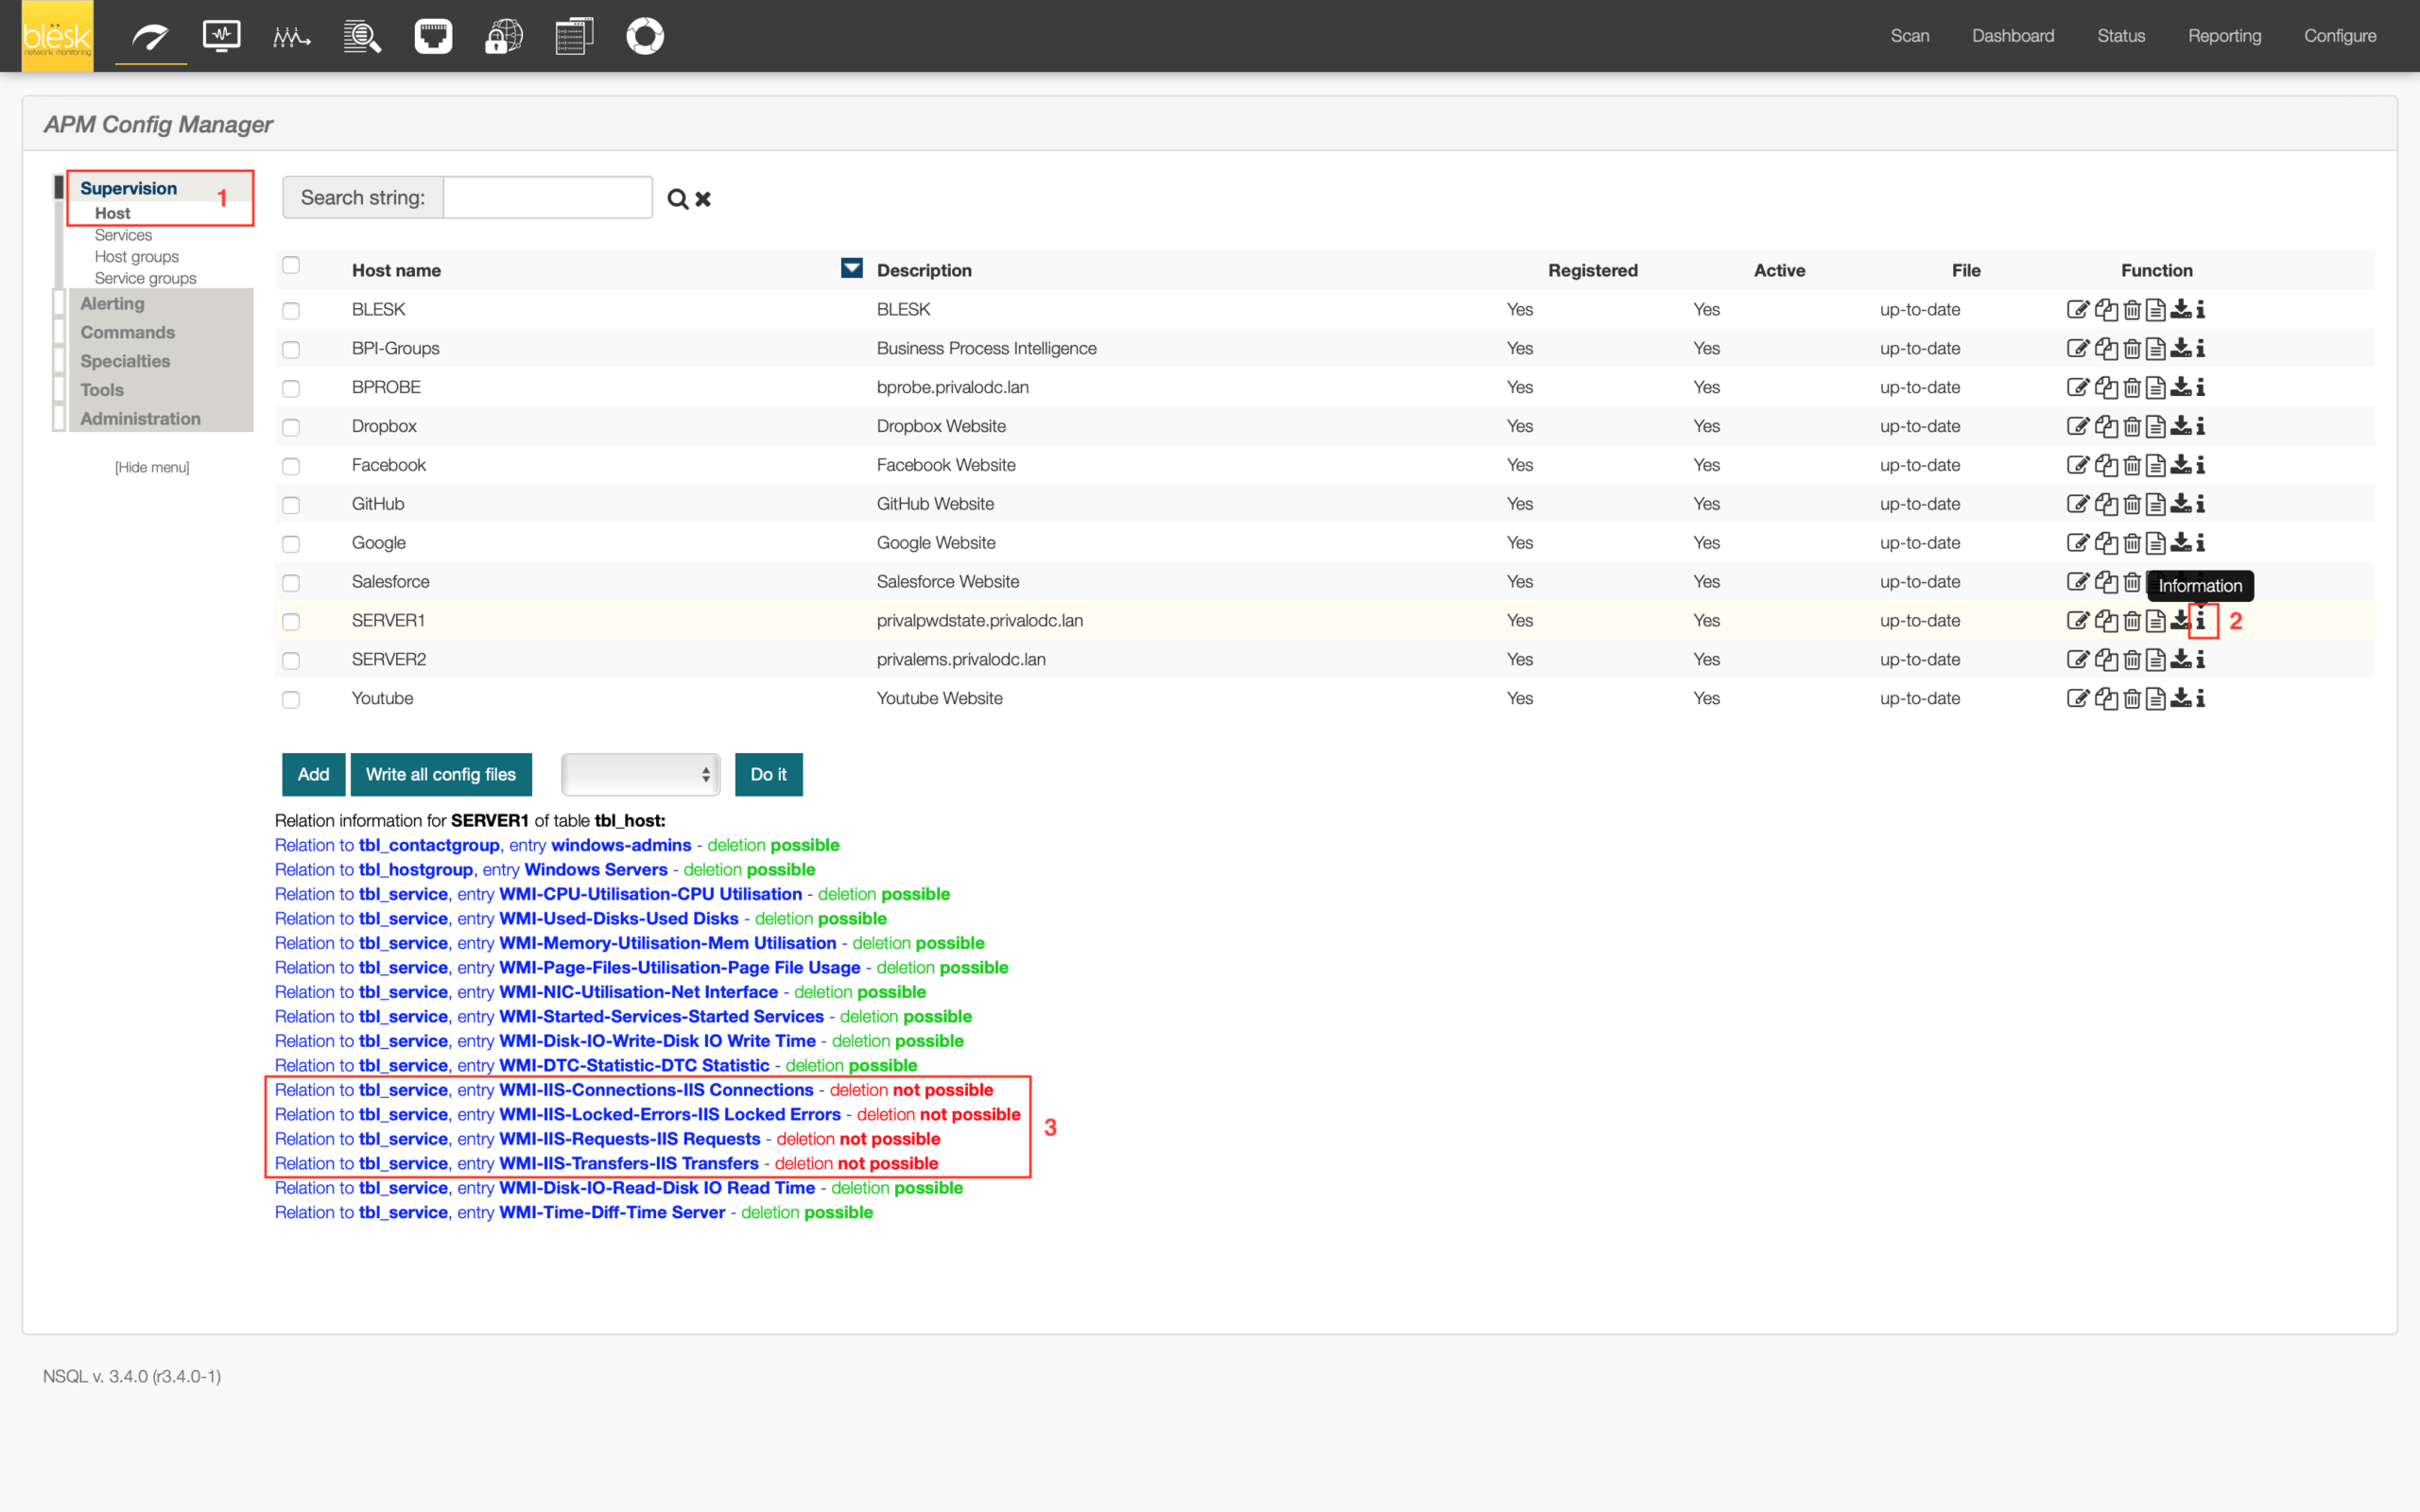
3 – In doing this exercise, we notice in the information returned on the relations of services with our device, that certain services can not currently be erased because they are only used by this device (SERVER1). Therefore, if the system lets us erase this host without first checking the dependencies of services, we would end up with orphan services hanging on nothing, which would make our software inconsistent and unstable!
We must therefore disassociate these services from the host by removing it. Go to Supervision | Services, then do a search for “WMI-IIS-“. Afterward, click on each icon representing the service to edit it.

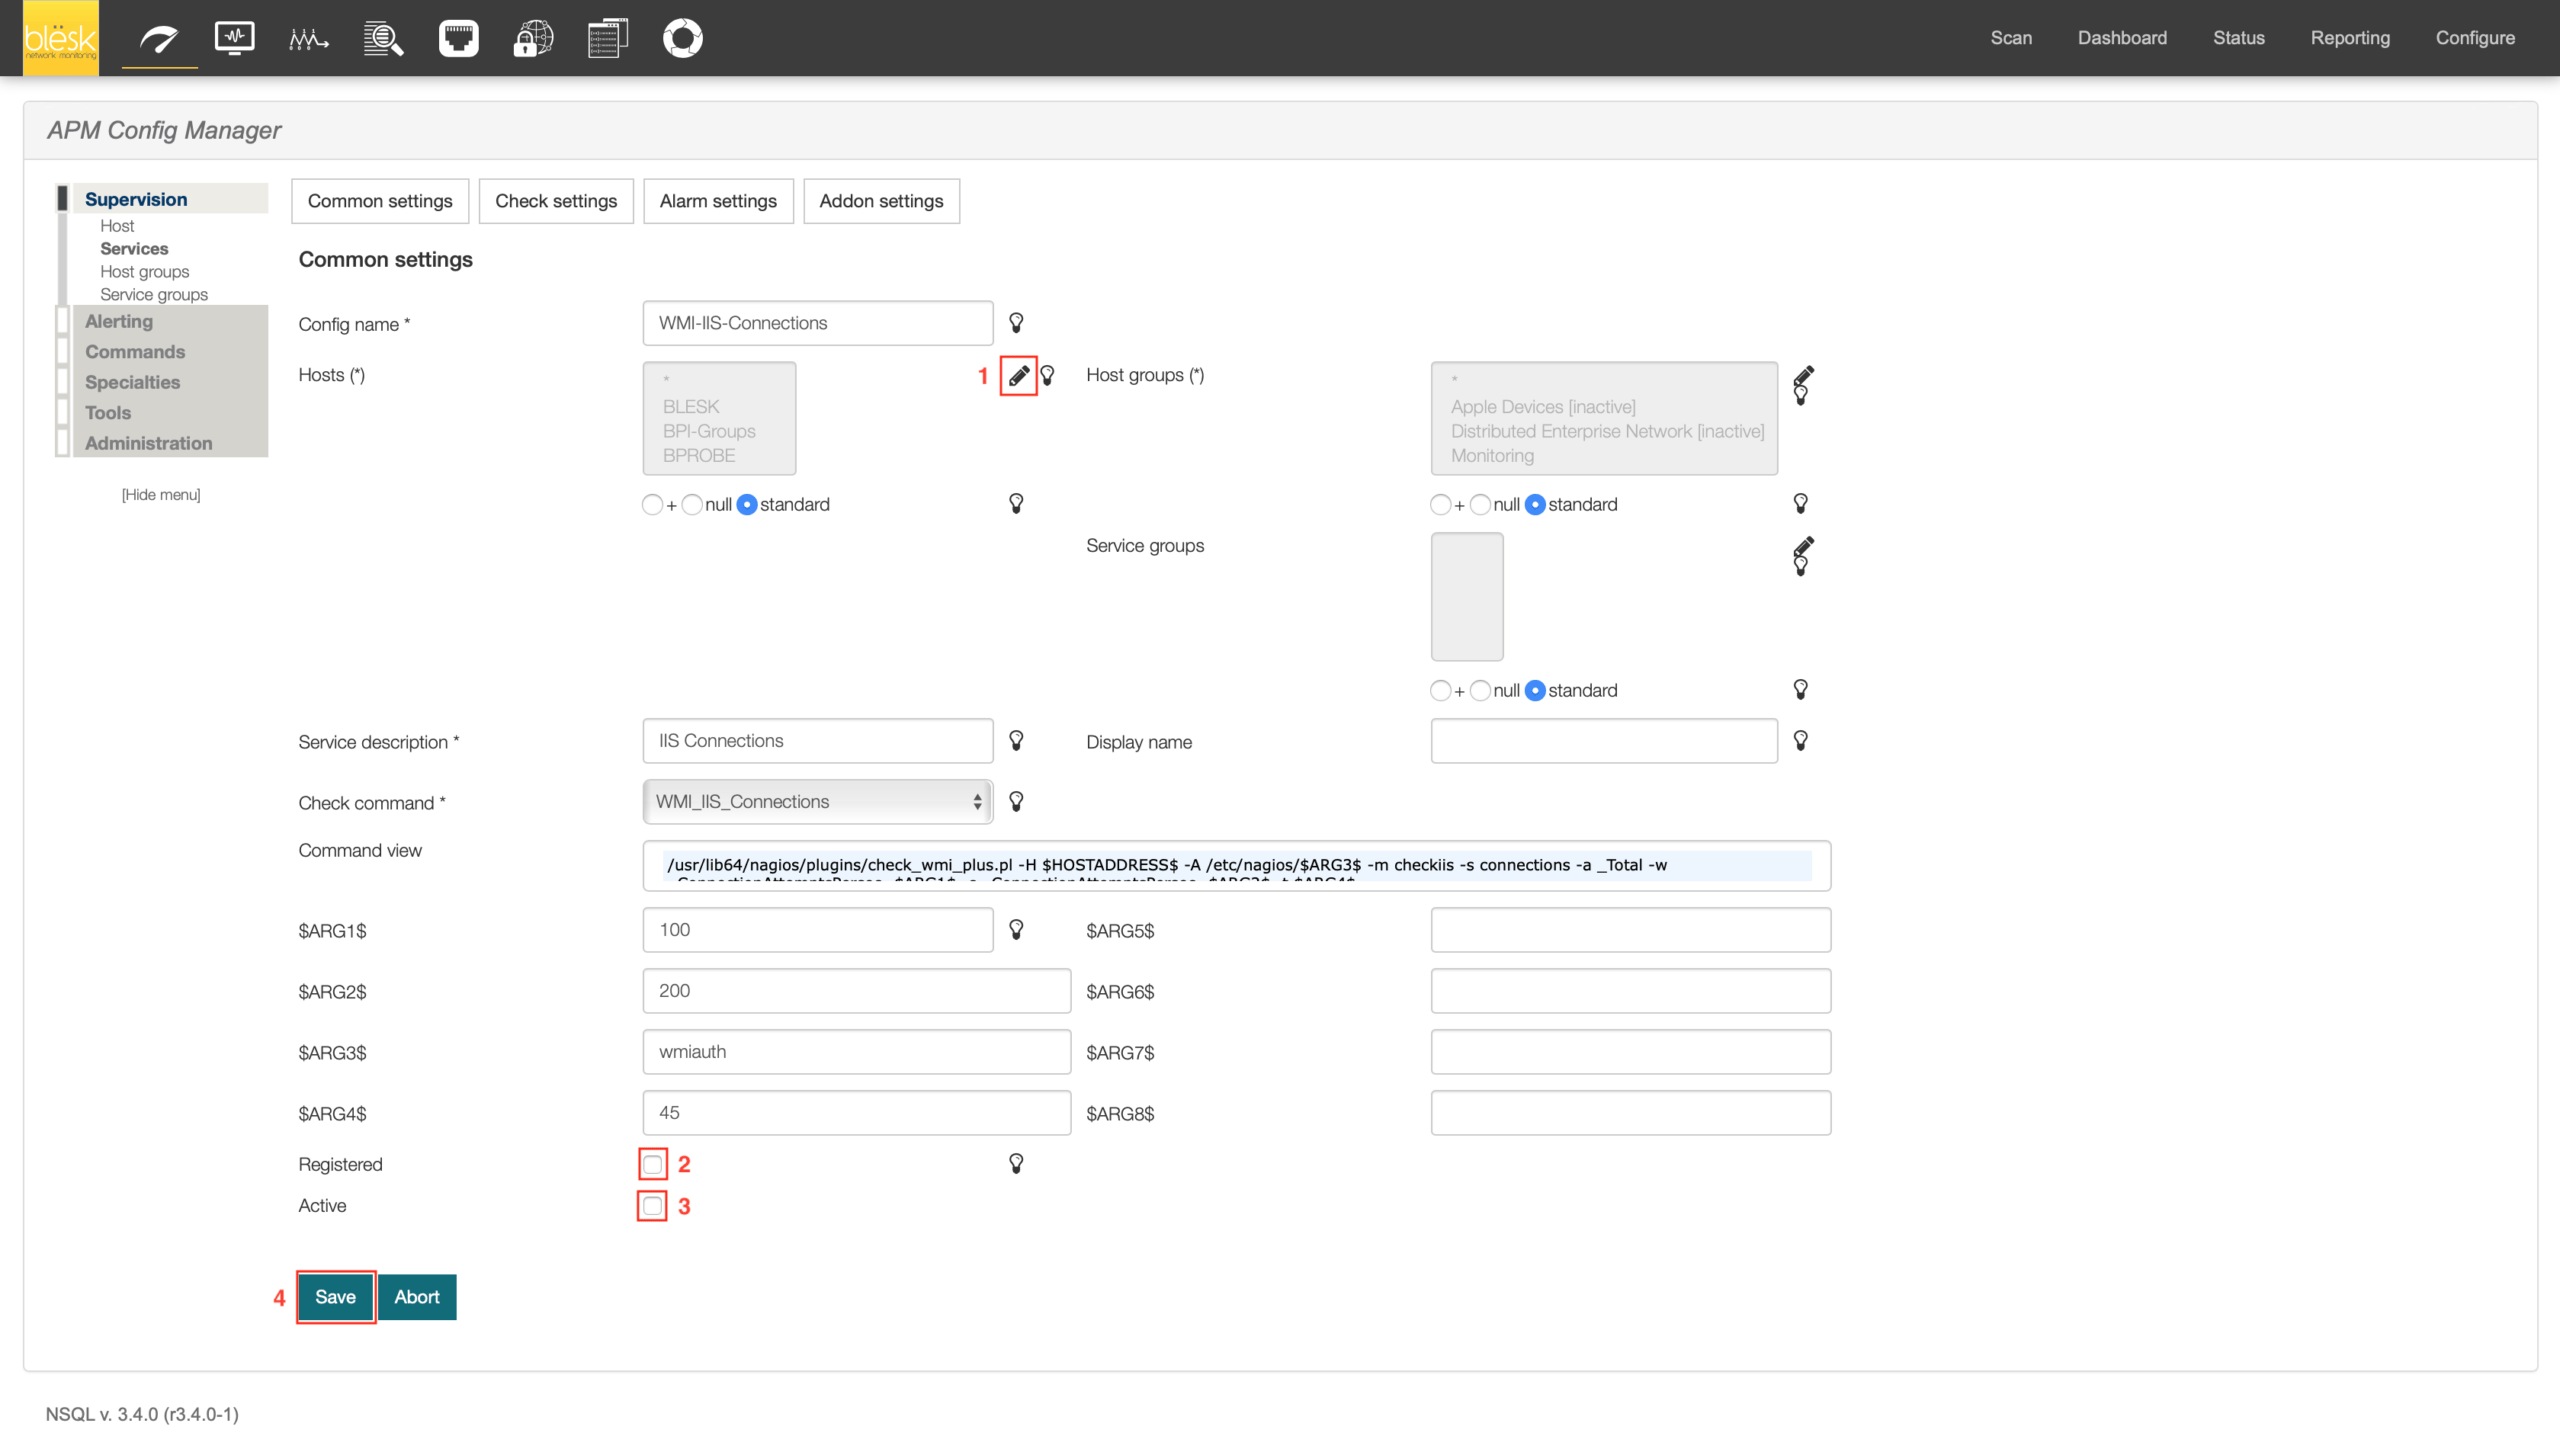
4 – Once in the service settings, click on the pencil icon to edit the section called “Hosts” listing all hosts on which the service applies. Remove from the list your device, then at the bottom of the page, uncheck the options called “Active” and “Registered” then click on the “Save” button. Repeat for the other services associated with your device.
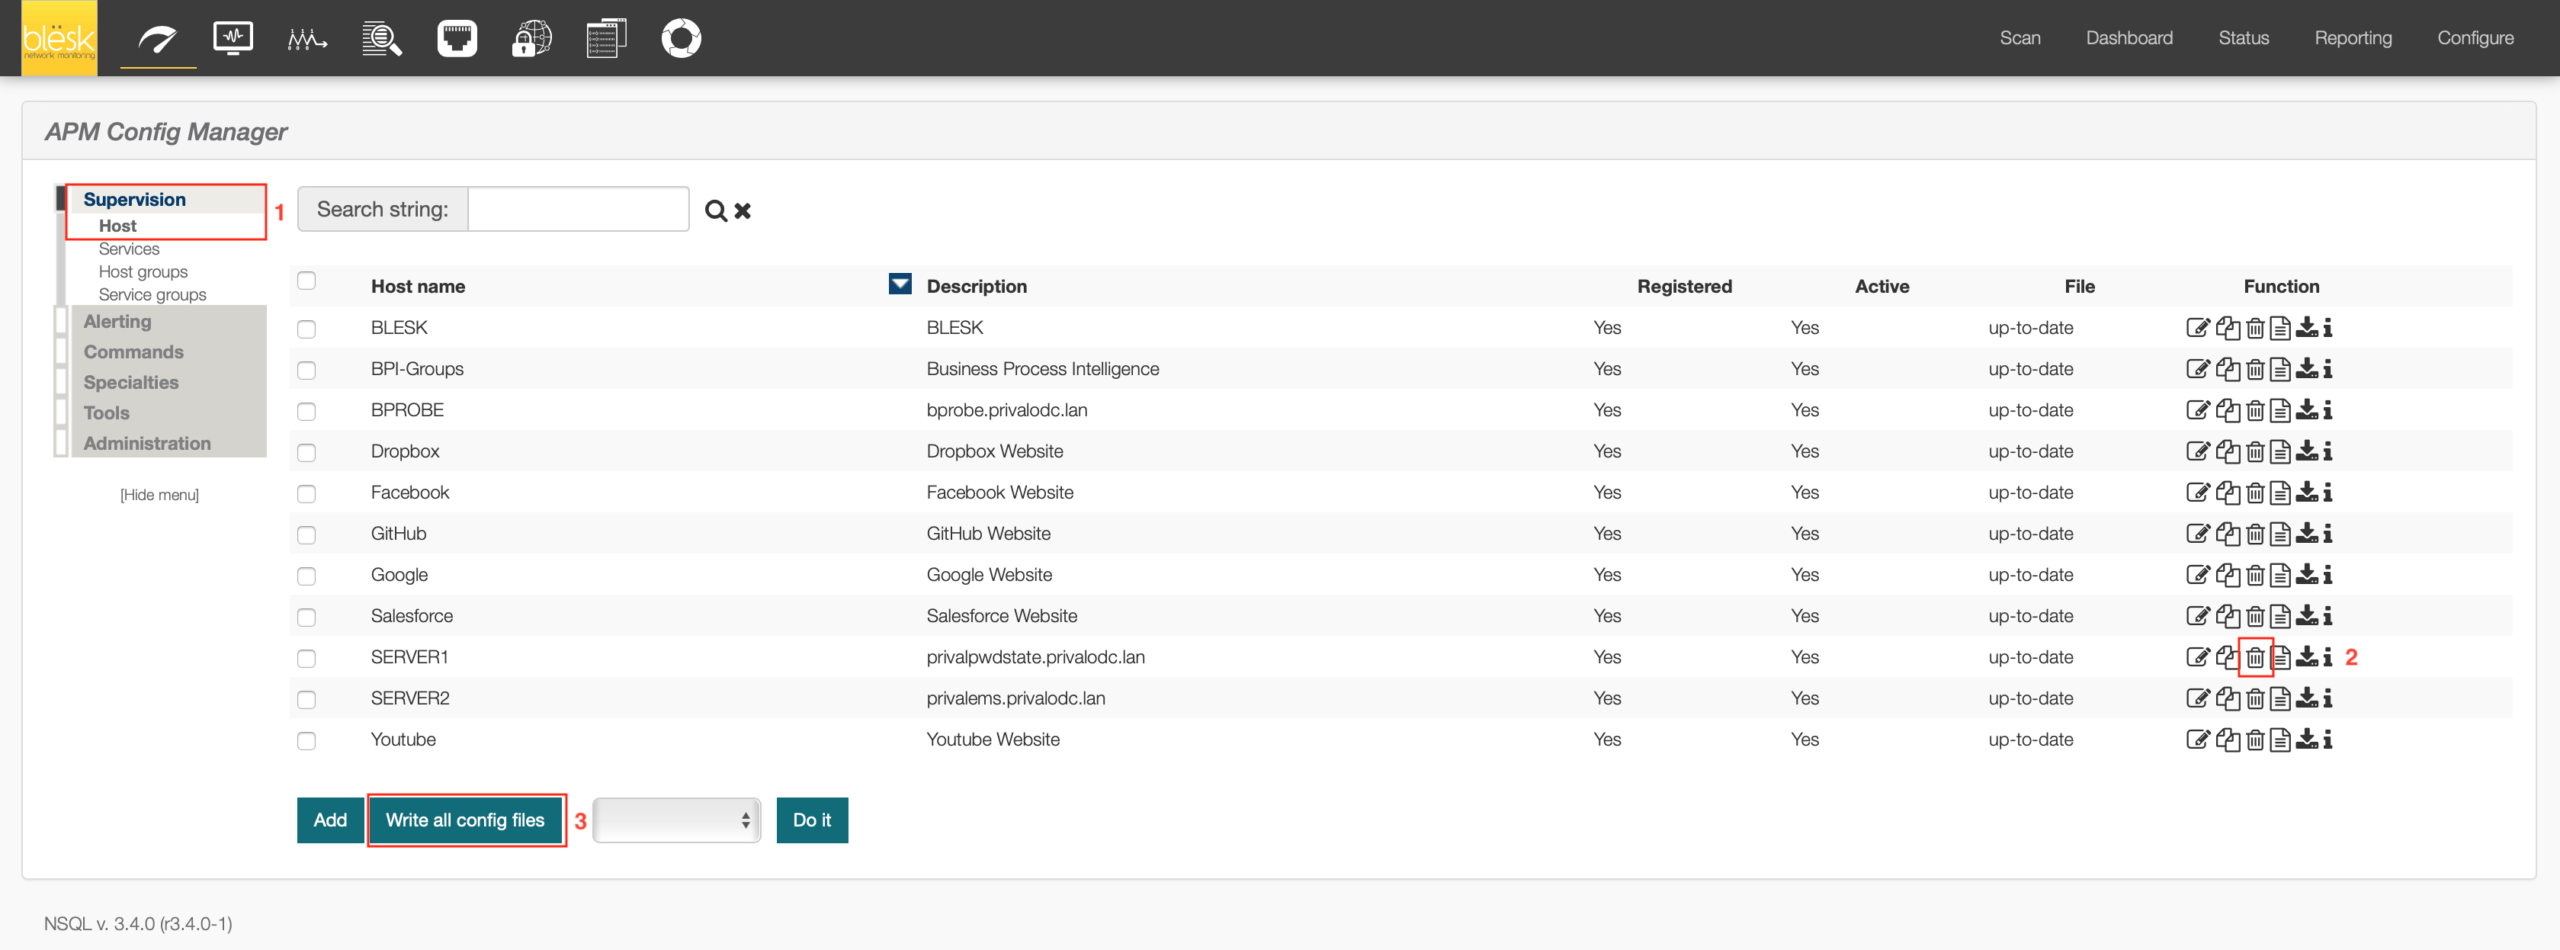
5 – Once completed, click on the button at the bottom of the page called “Write all config files” in order to write all the changes to the server disk.

6 – Now we can go back to the “Host” tab to erase our device called “SERVER1”. Click Supervision | Host, then search the list for the host “SERVER1” and click on the “Delete” icon to erase it. This time, you are able to do this because there is no longer a service dependency associated with the device. Do not forget to click on the button at the bottom of the page called “Write all config files” in order to write all the modifications to the server disk.
7 – Finally, go to the Tools | Control and click on the four buttons on this page in the order shown below (from top to bottom). This allows for a final check and ensure that everything is set before restarting the process in real time. Note, that if you see an error, it is important to fix it before restarting the process.

¶ No other device of this type
The second case that could occur and prevent the removal of the device, would be if it is the last device of its type still monitored in blësk.
1 – SERVER2 is the only remaining Windows server. If we try to delete it, we will receive an error message indicating that there are several services dependent on it. These are the services that were associated by default with this type of device (Windows Server) by blësk auto detection.
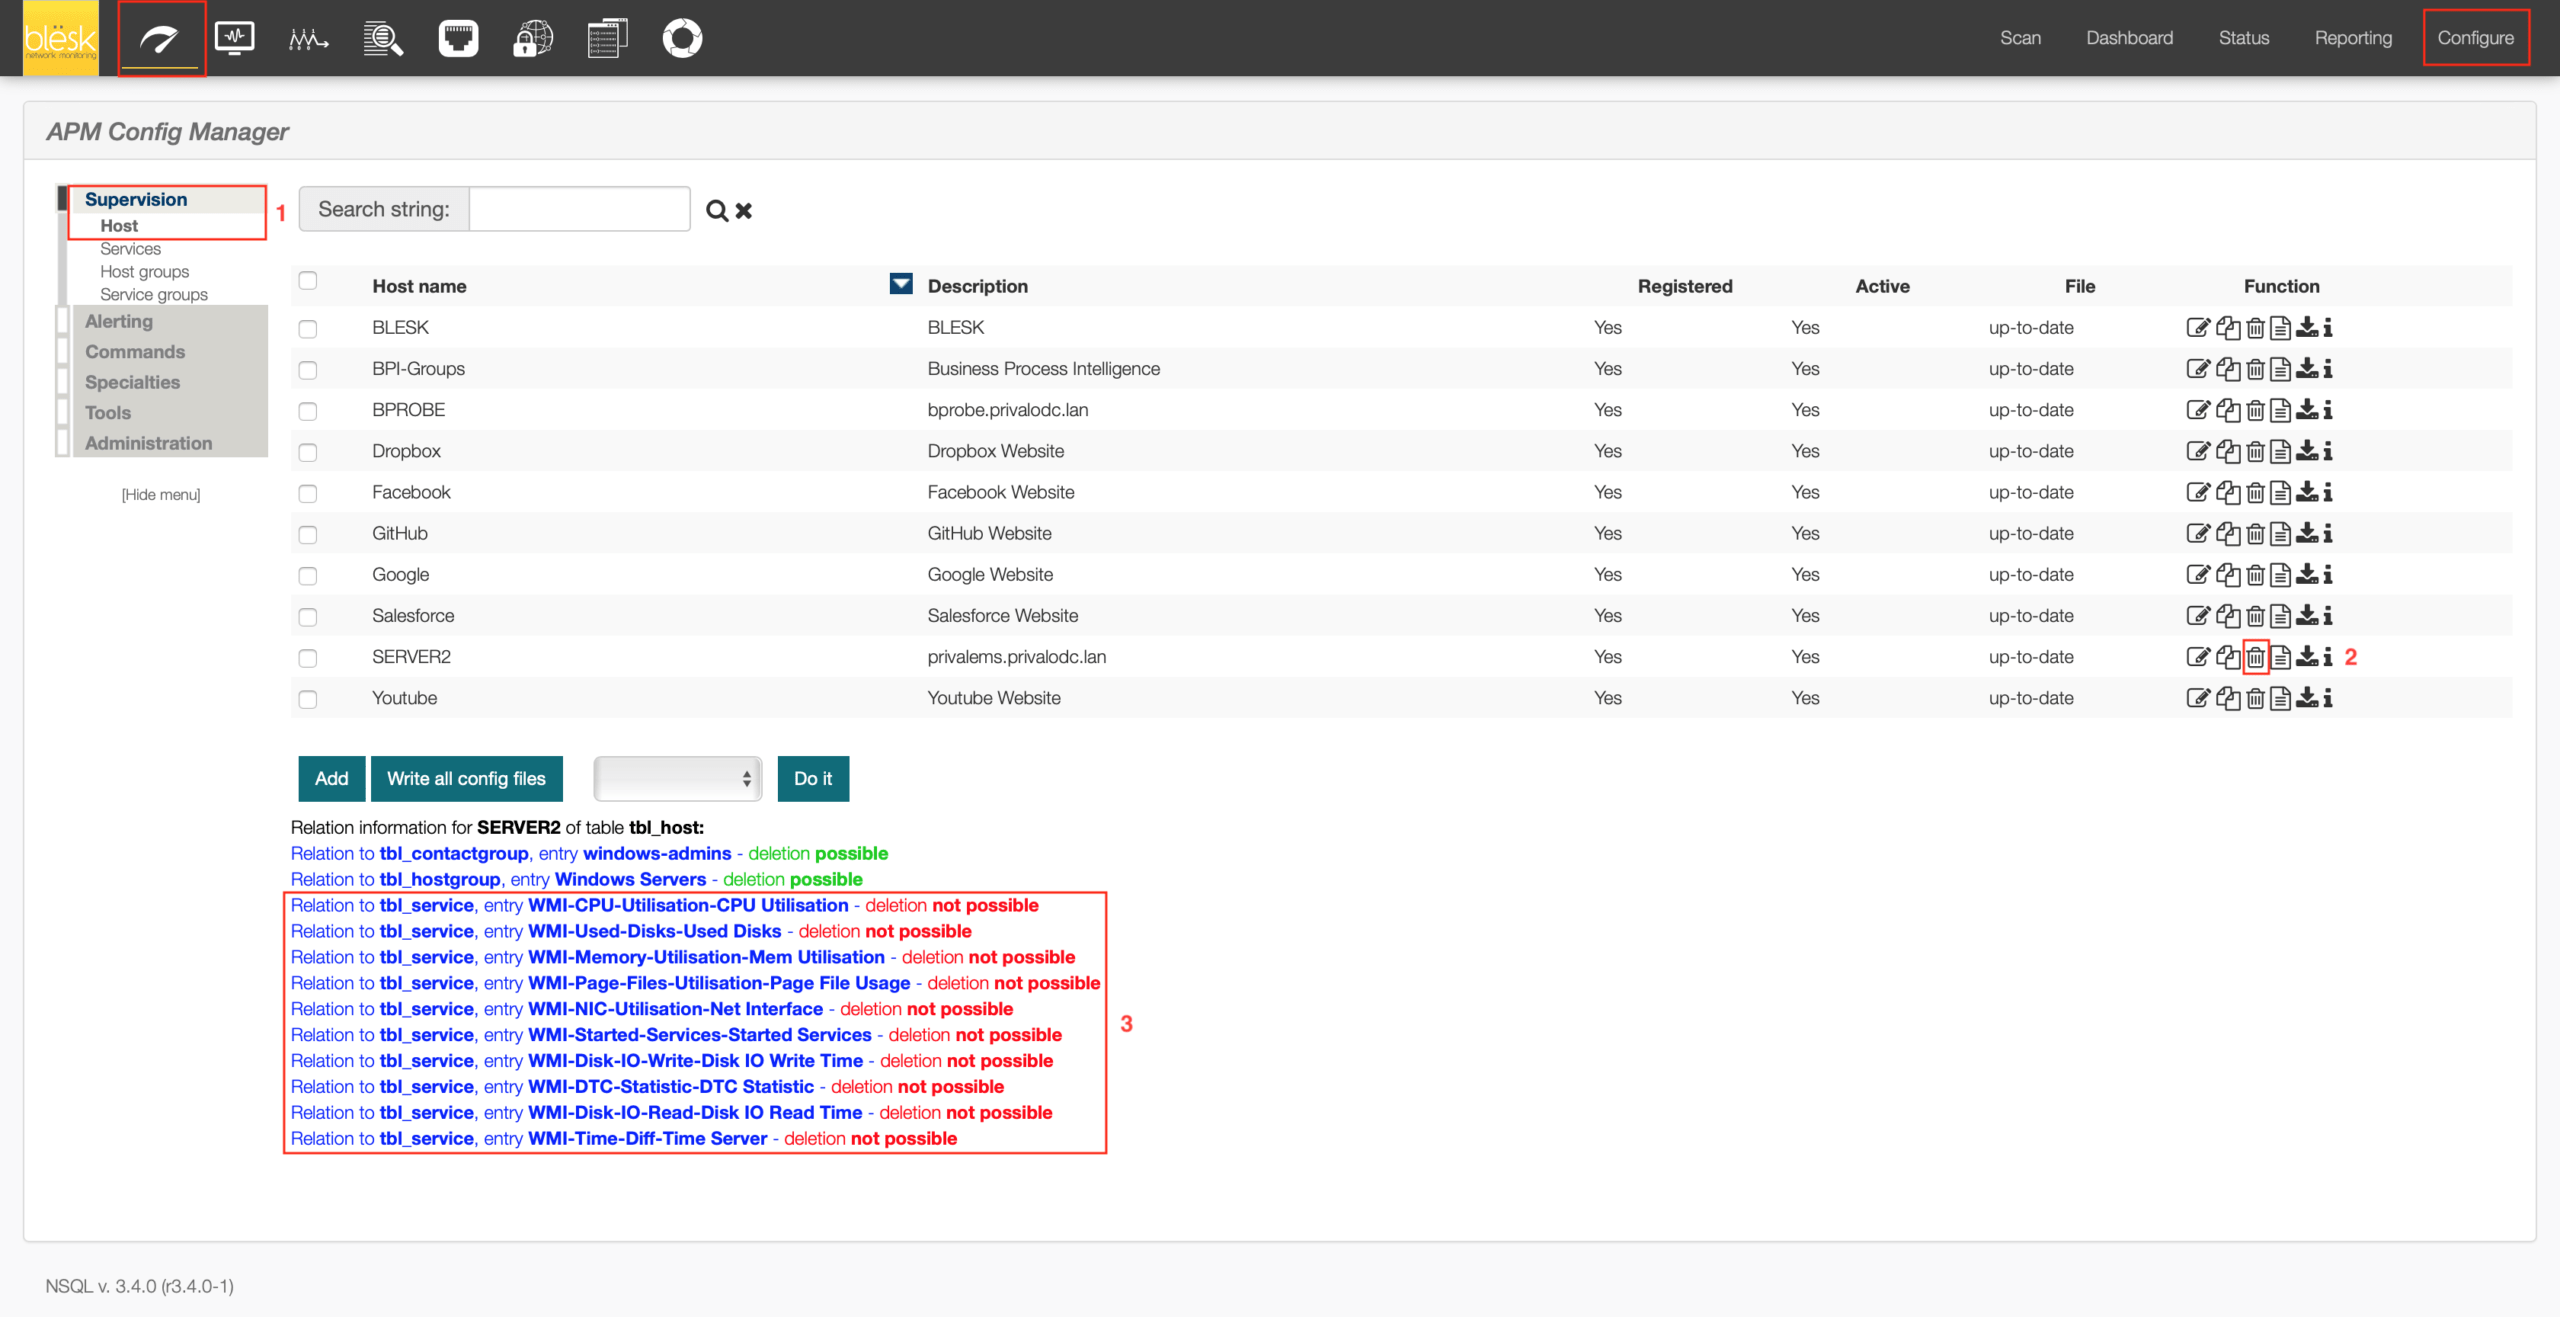
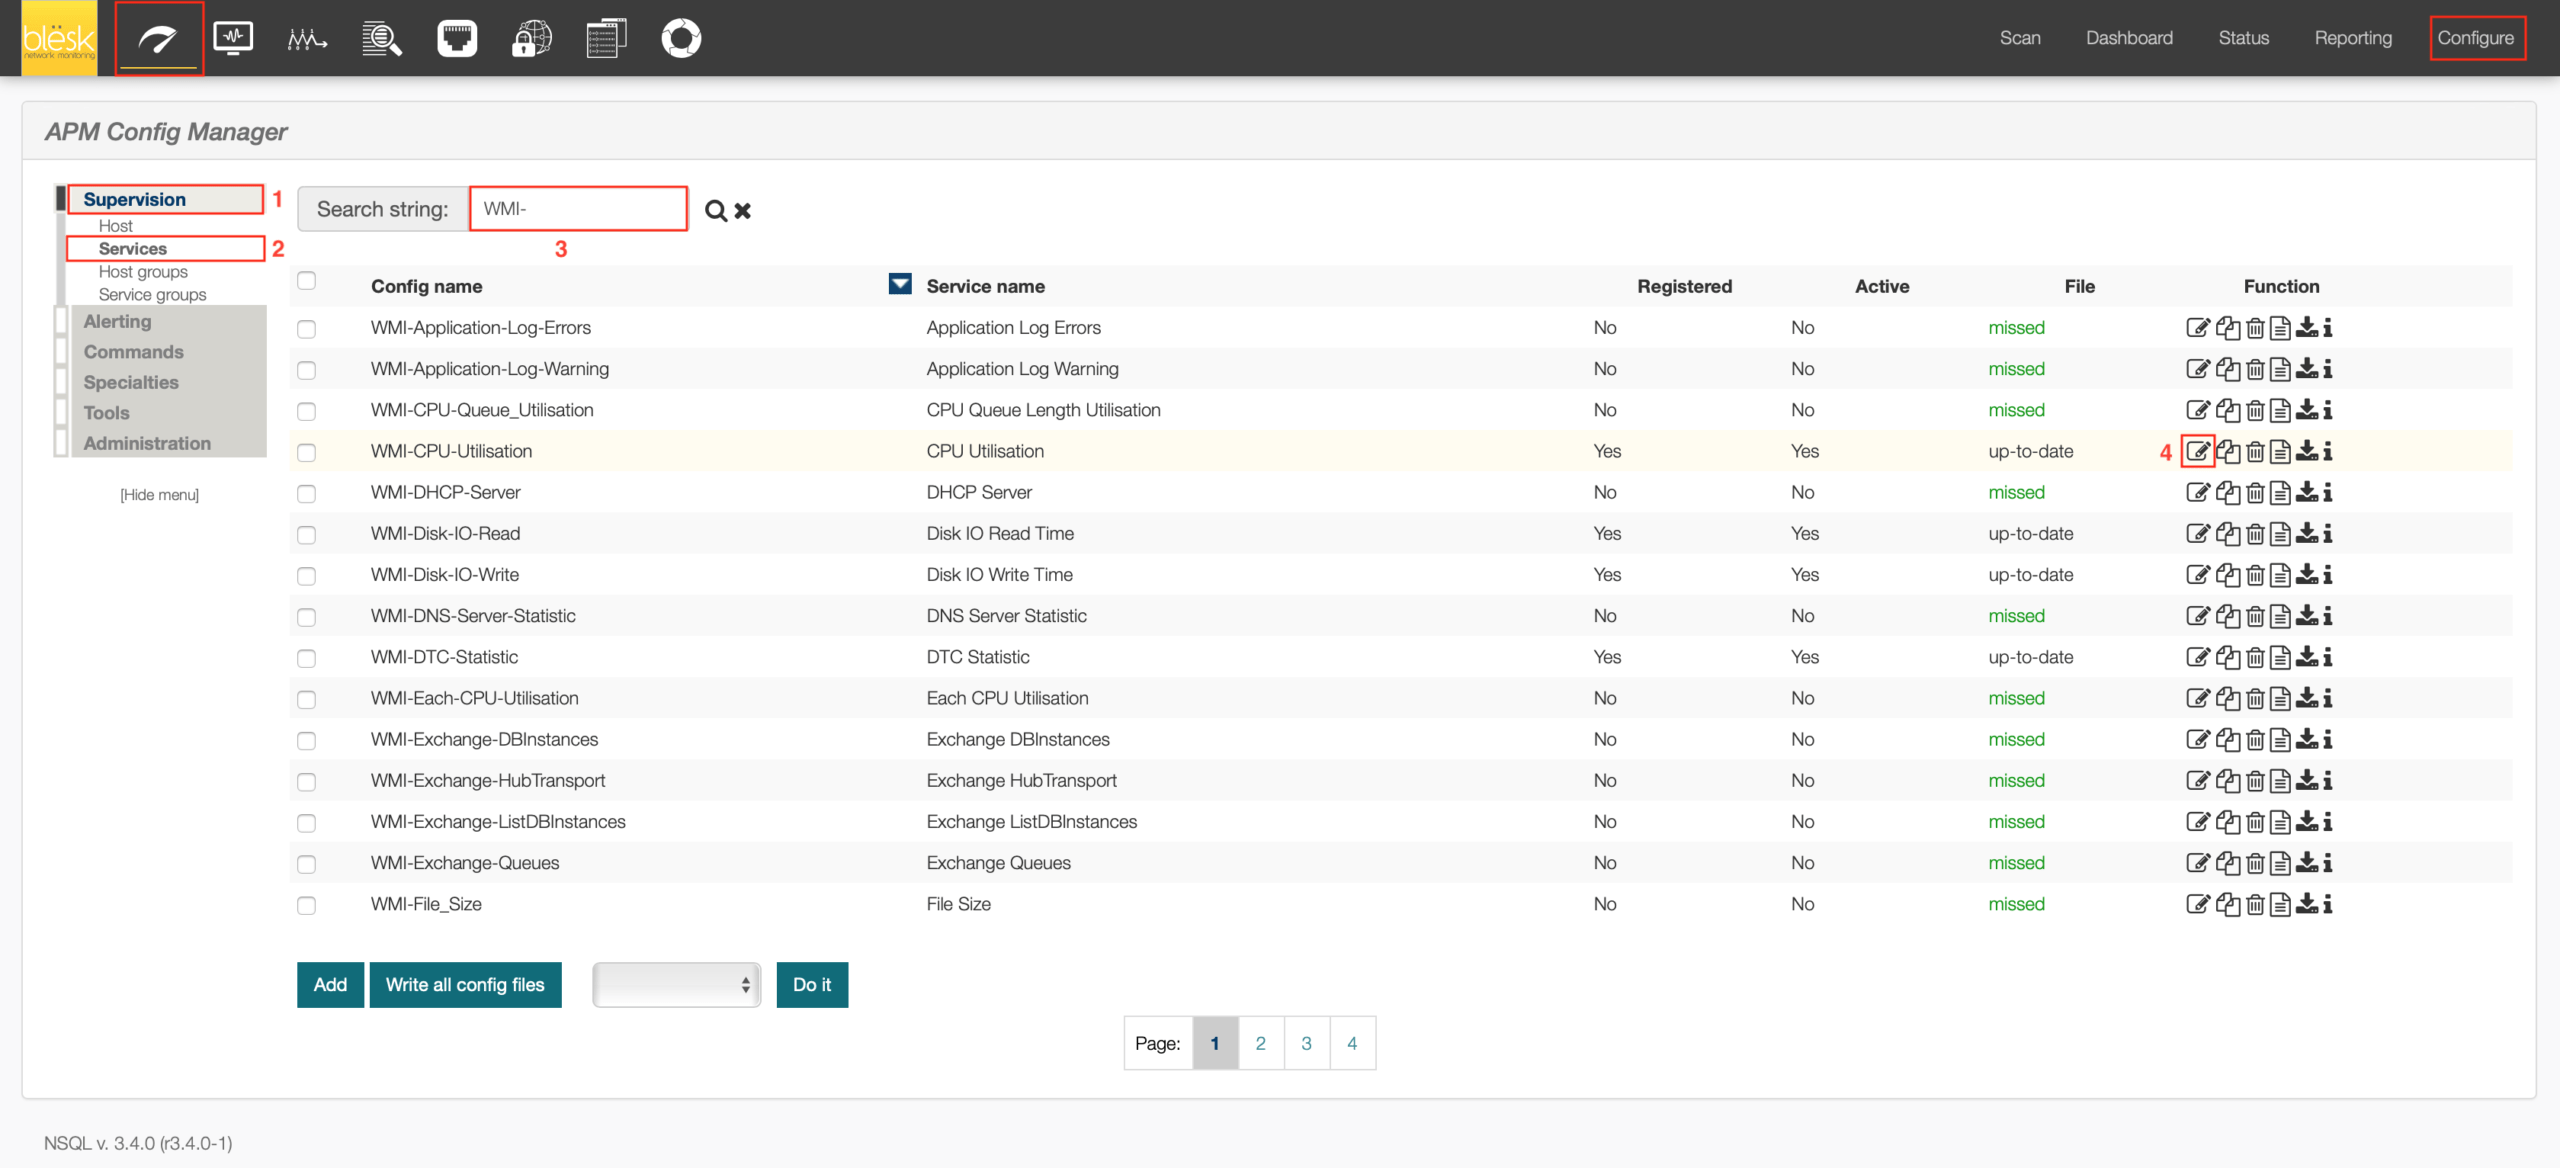
2 – We must therefore do the same exercise as before by disassociating these services from the device before being able to erase it. Go to Supervision | Services and do a search for all services listed, then click on the “Edit” icon for each of them to access their settings.
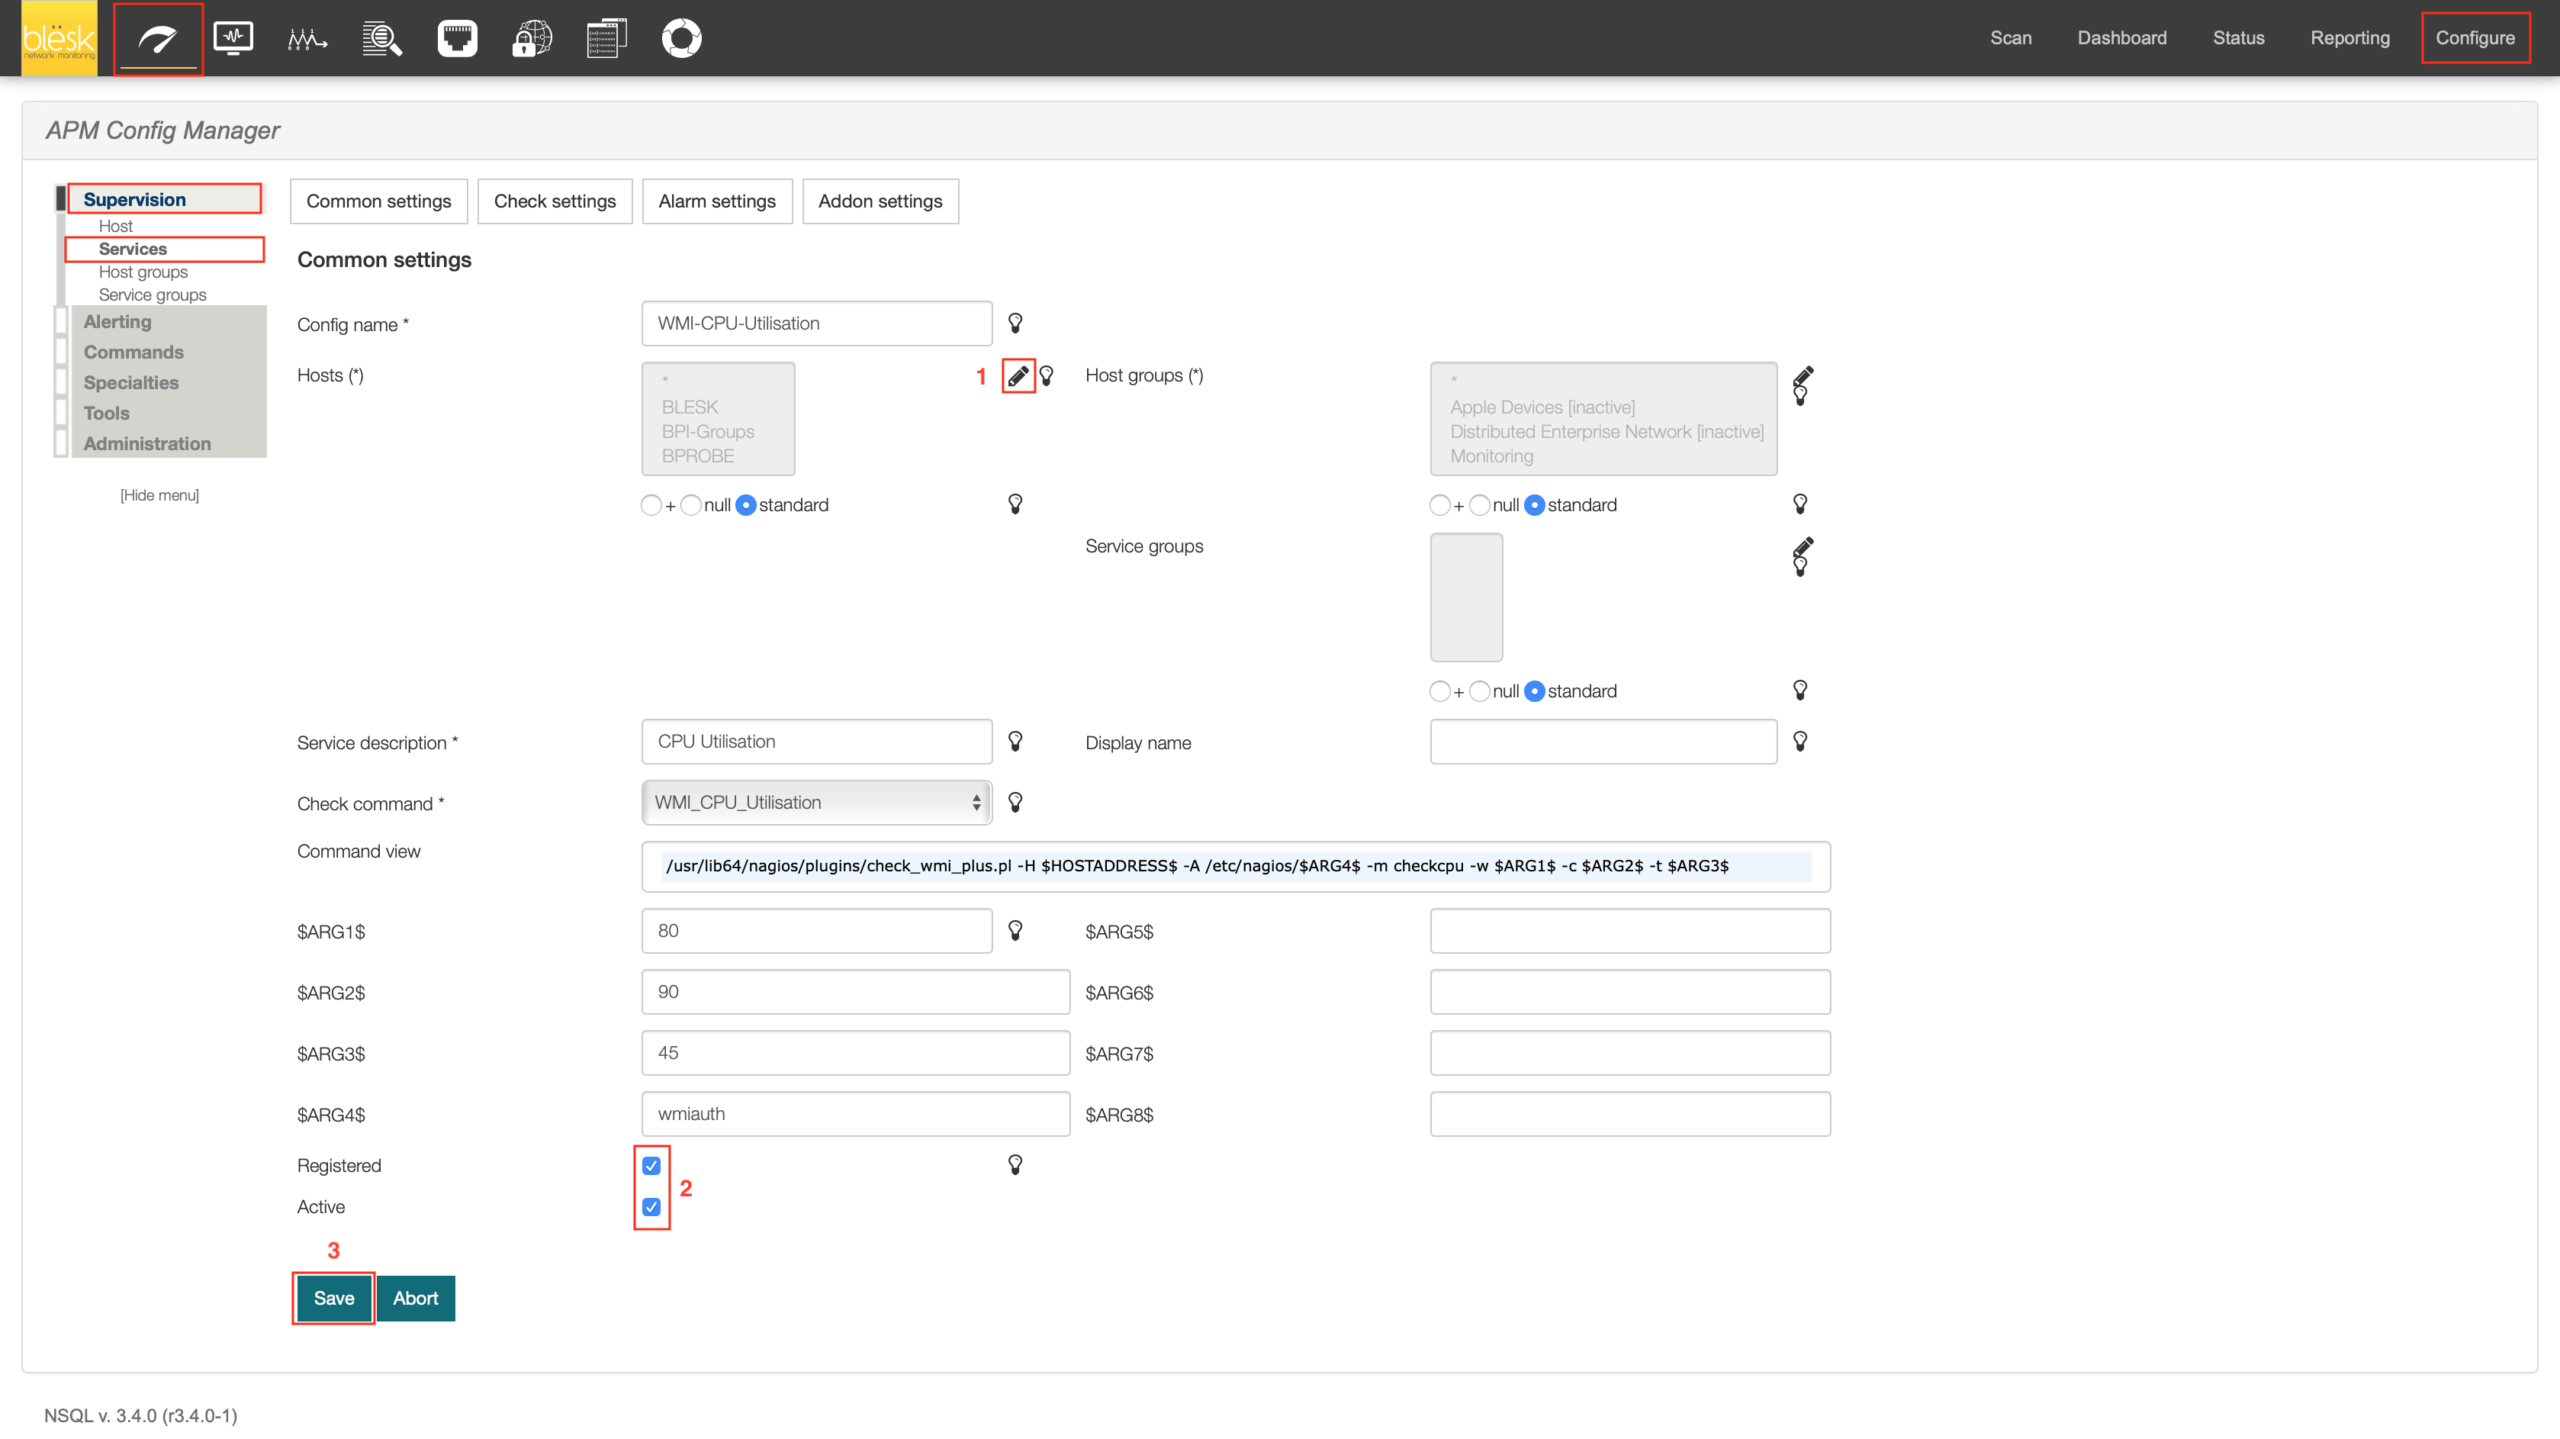
3 – Once in the settings of these services, click on the pencil icon to edit the section called “Hosts“, which lists all the hosts on which the service applies. Remove your device from the list, then at the bottom of the page uncheck the options labeled “Active” and “Registered” and click on the “Save” button. Repeat for other related services remaining.
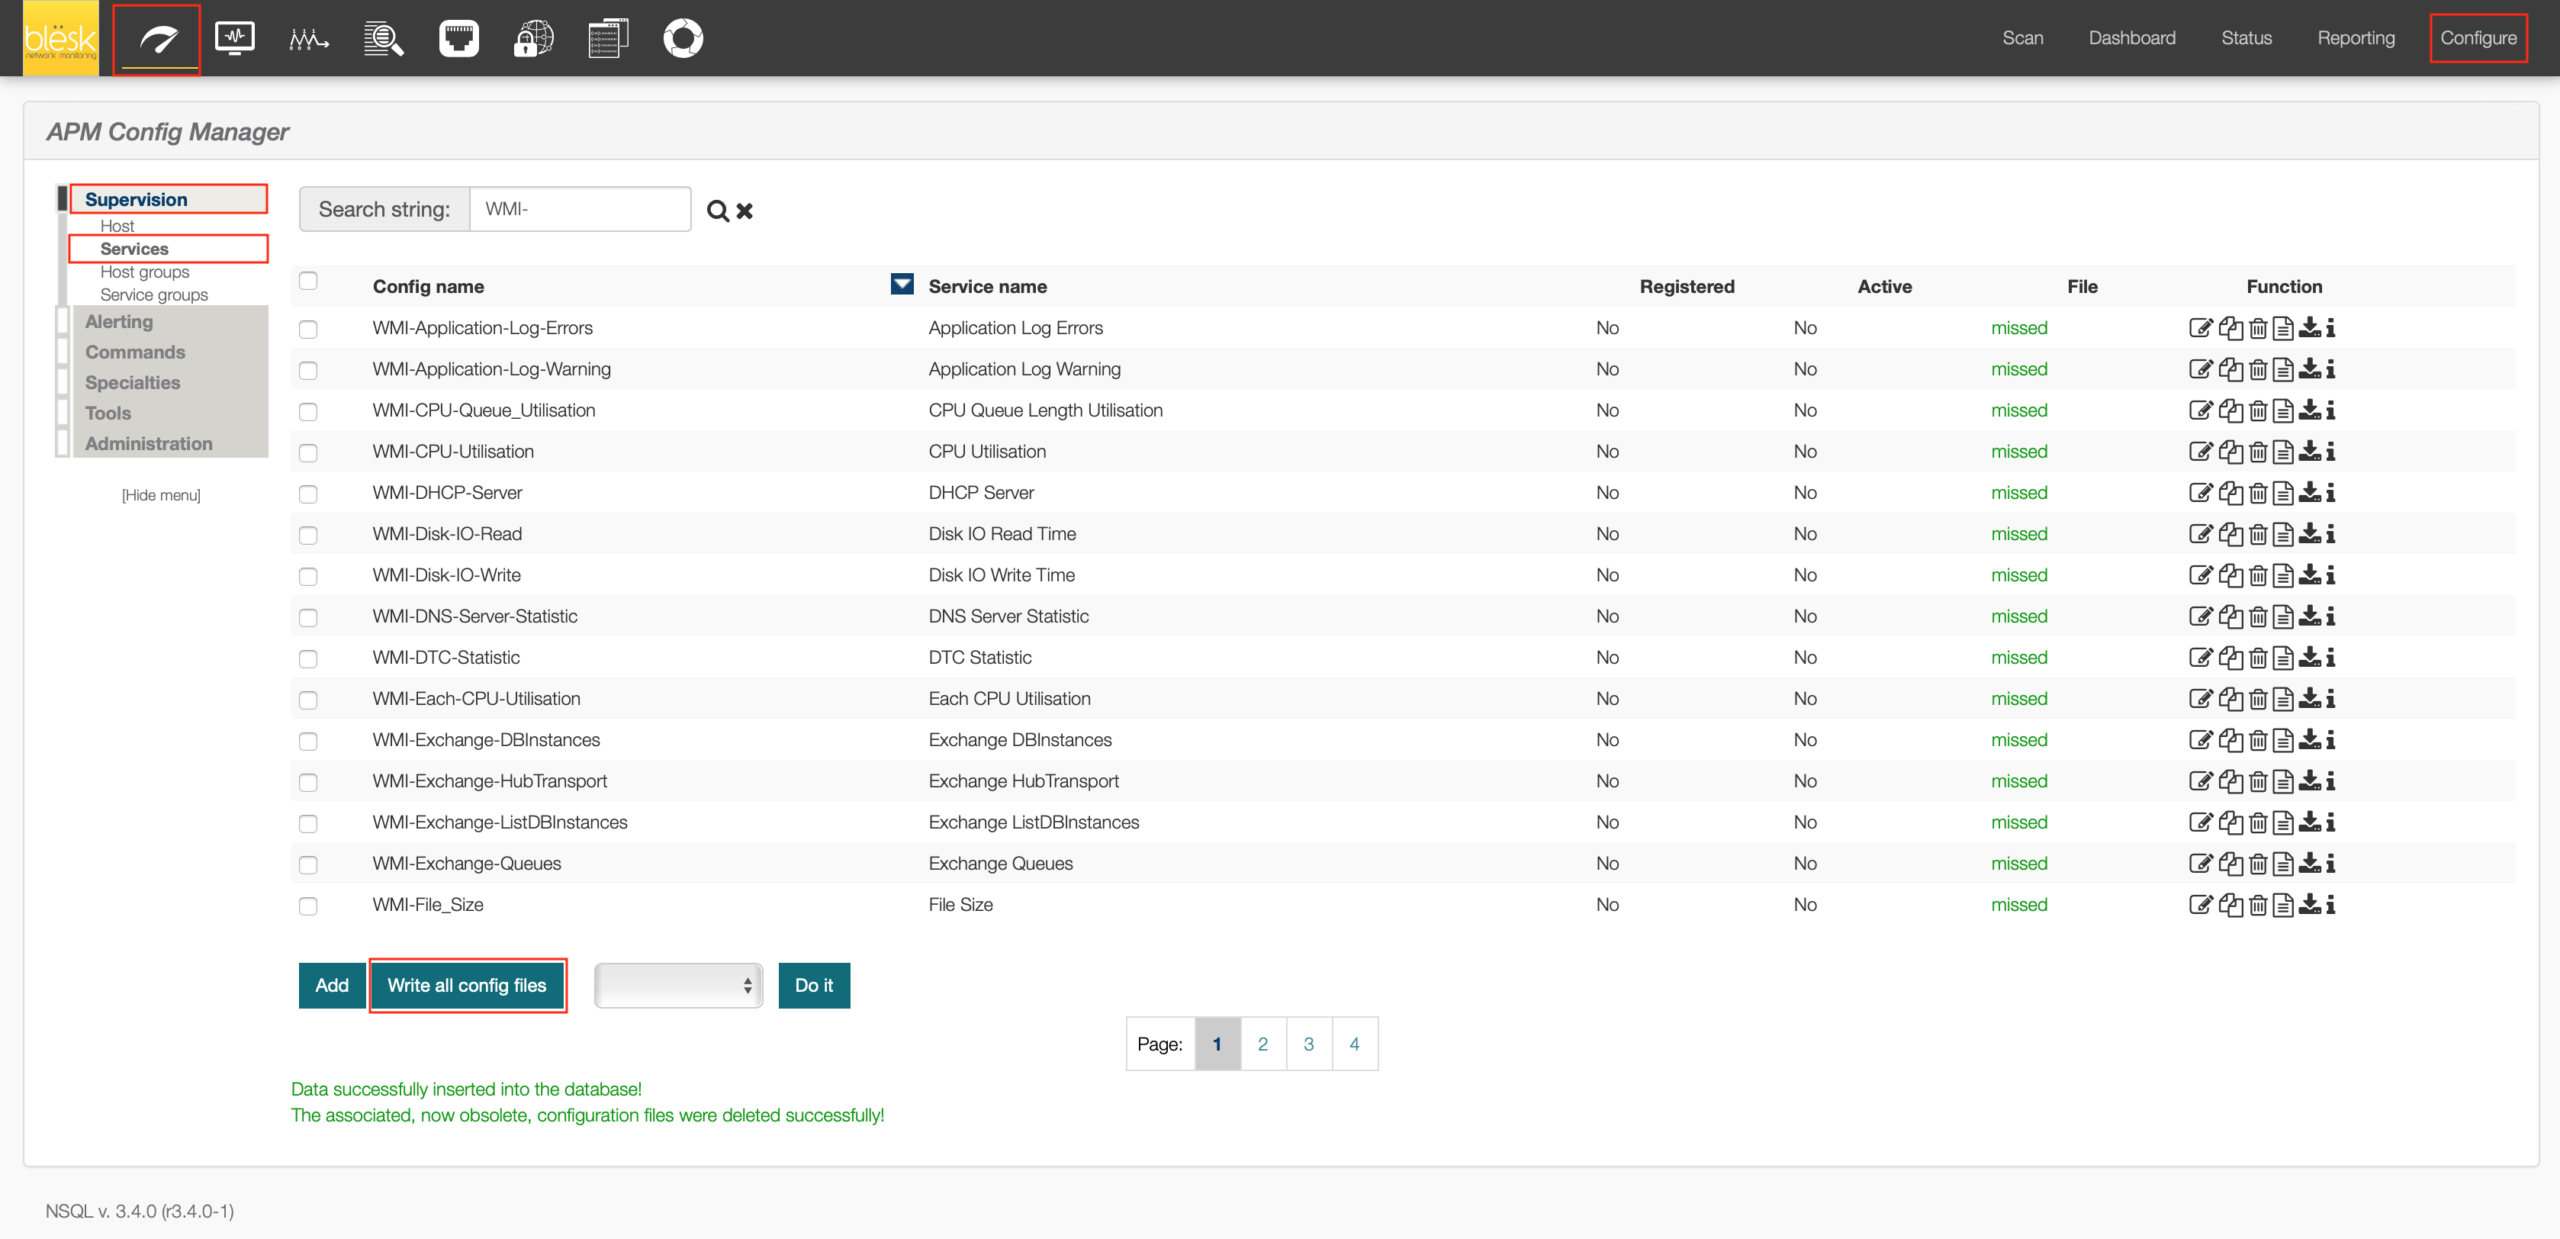
4 – Once completed, click on the button at the bottom of the page called “Write all config files” in order to write all the modifications to the server’s disk.
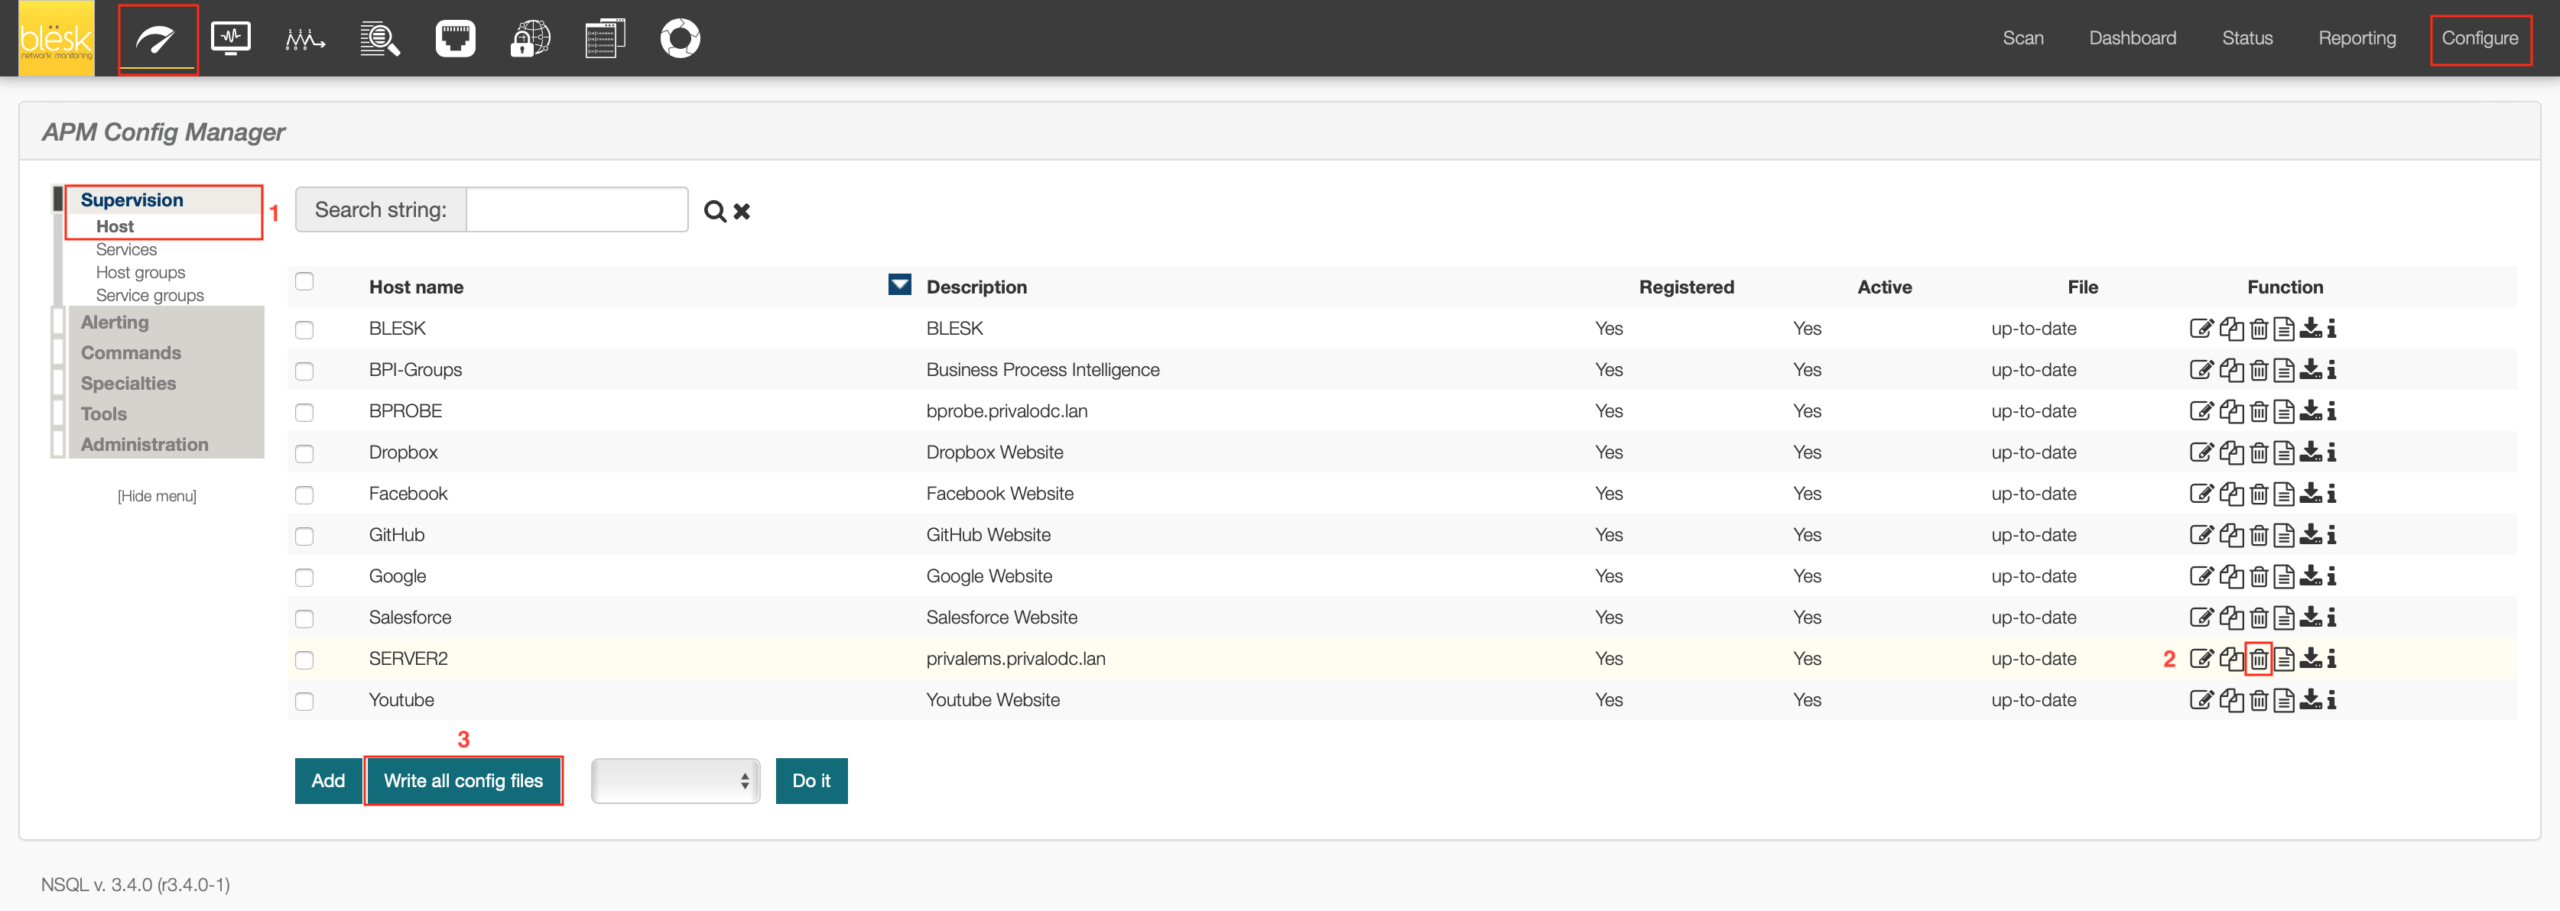
5 – Now we can go back to the “Host” tab to erase our device called “SERVER2”. Click Supervision | Host, then search the list for the host “SERVER2” and click on the “Delete” icon to delete it. This time, you are able to do this because there is no longer a service dependency associated with the device. Do not forget to click on the button at the bottom of the page called “Write all config files” in order to write all the modifications to the server disk.
6 – Finally, go to the Tools | Control and click on the four buttons on this page in the order shown below (from top to bottom). This allows for a final check and ensures that everything is set before restarting the process in real time. Note, that if you see an error, it is important to fix it before restarting the process.

¶ Usual case for erasing
1 – In general, if none of the cases listed above are encountered, removing a device is simply a matter of going to Supervision | Host then clicking on the “Delete” icon of the host in the list, followed by a “write all config files“.
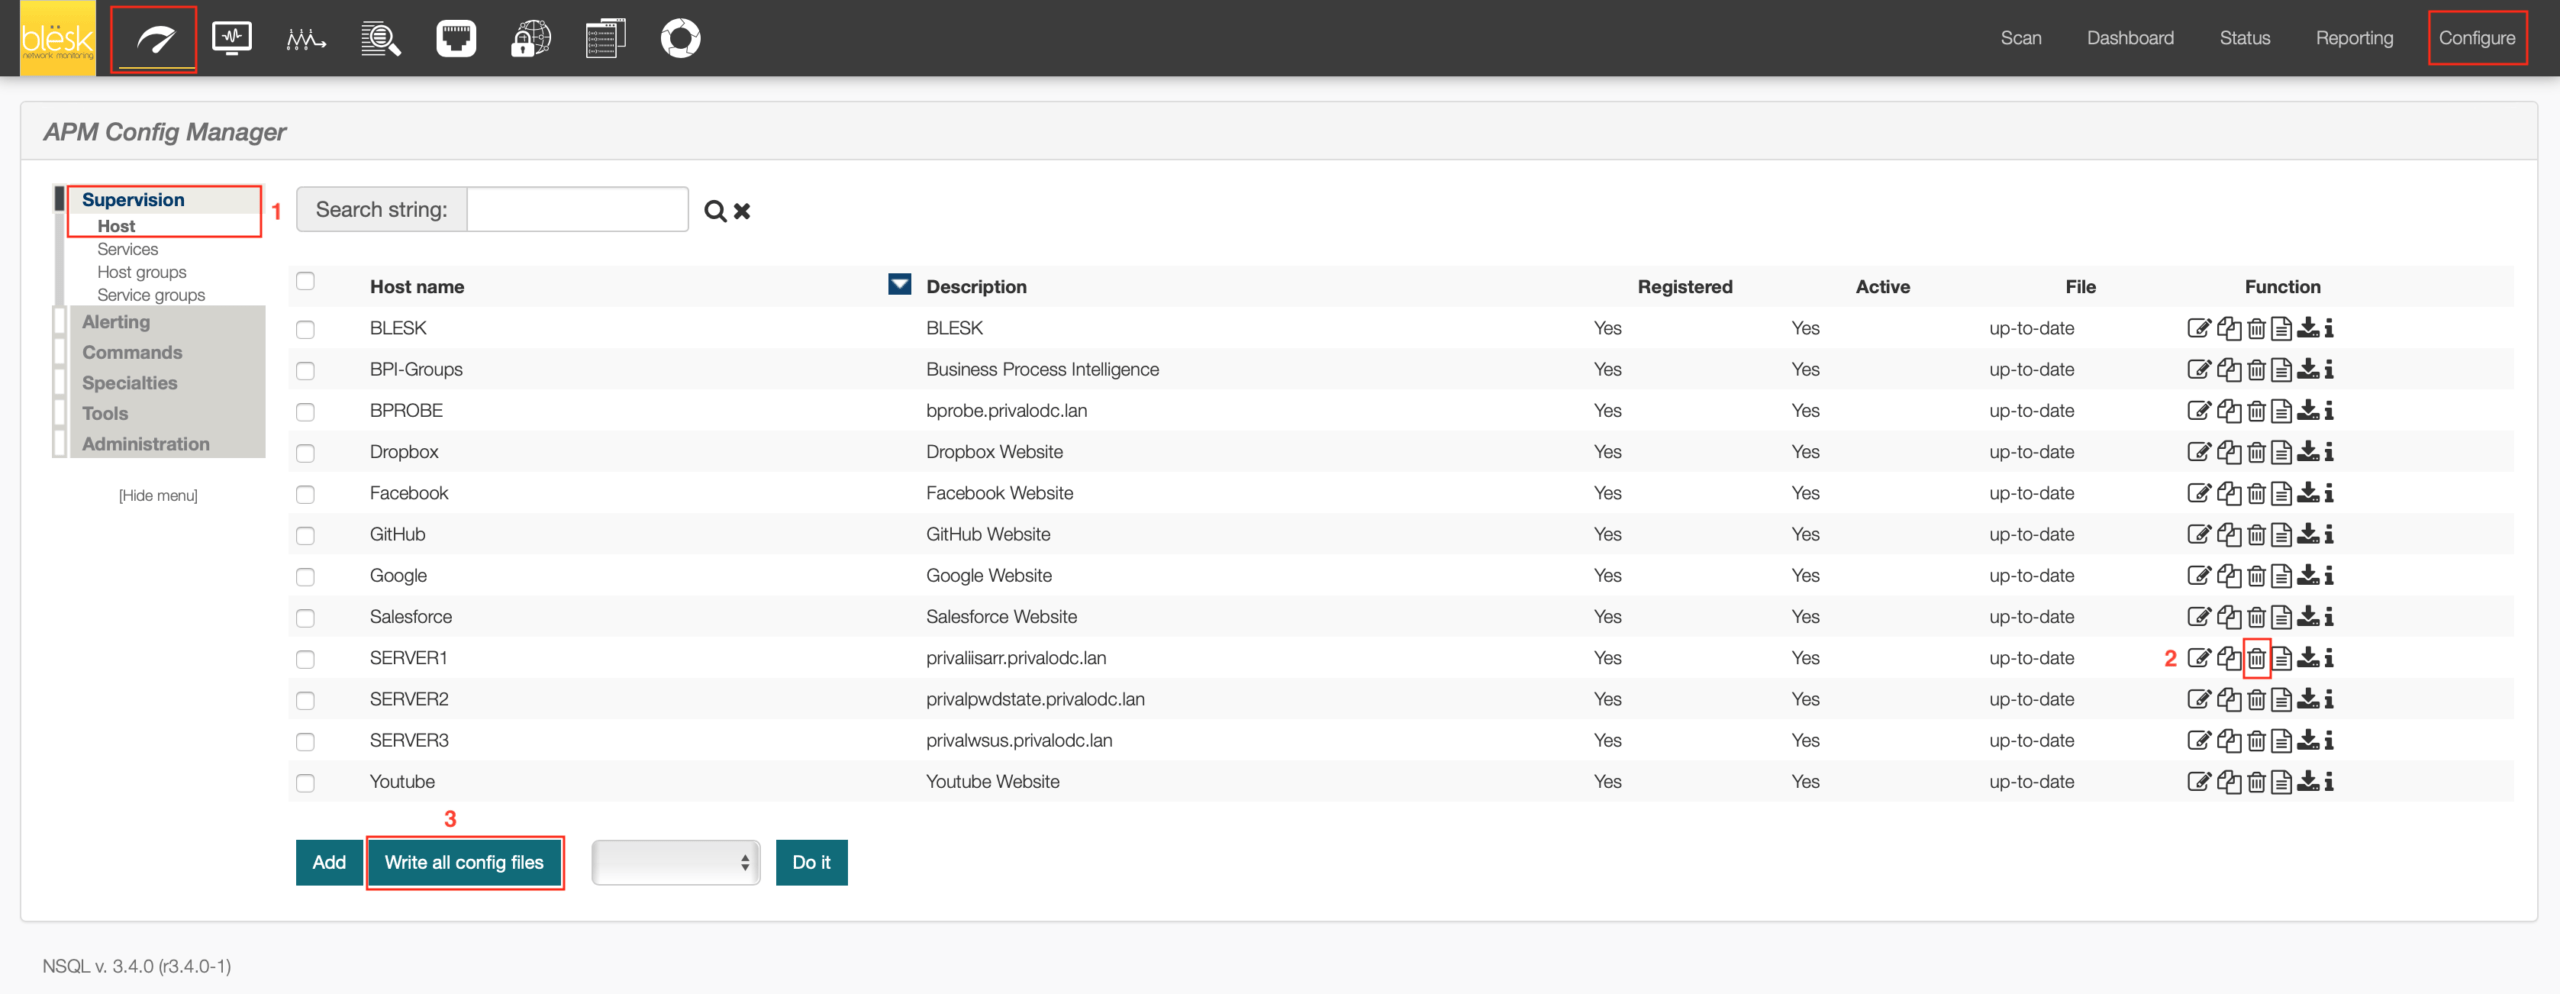
2 – Afterwards, do not forget to go to Tools | Control and click on the four buttons on this page in the order shown below (from top to bottom). This allows for a final check and ensures that everything is set before restarting the program process in real time. Note, that if you see an error, it is important to fix it before restarting the process.
